By: CS2103-AY2018/19s2-W10-4 Team Since: Mar 2019 Licence: MIT
- 1. Setting up
- 2. Design
- 3. Implementation
- 4. Documentation
- 5. Testing
- 6. Dev Ops
- Appendix A: Product Scope
- Appendix B: User Stories
- Appendix C: Use Cases
- Appendix D: Non Functional Requirements
- Appendix E: Glossary
- Appendix F: Instructions for Manual Testing
- F.1. Launch and Shutdown
- F.2. Card operations
- F.3. Starting and ending a test session
- F.4. Answering a question in a test session
- F.5. Navigating to the next question in a test session
- F.6. Viewing a report display
- F.7. Sorting the cards
- F.8. Folder operations
- F.9. Navigating in and out of folders
- F.10. Saving data
1. Setting up
1.1. Prerequisites
-
JDK
9or laterJDK 10on Windows will fail to run tests in headless mode due to a JavaFX bug. Windows developers are highly recommended to use JDK9. -
IntelliJ IDE
IntelliJ by default has Gradle and JavaFx plugins installed.
Do not disable them. If you have disabled them, go toFile>Settings>Pluginsto re-enable them.
1.2. Setting up the project in your computer
-
Fork this repo, and clone the fork to your computer
-
Open IntelliJ (if you are not in the welcome screen, click
File>Close Projectto close the existing project dialog first) -
Set up the correct JDK version for Gradle
-
Click
Configure>Project Defaults>Project Structure -
Click
New…and find the directory of the JDK
-
-
Click
Import Project -
Locate the
build.gradlefile and select it. ClickOK -
Click
Open as Project -
Click
OKto accept the default settings -
Open a console and run the command
gradlew processResources(Mac/Linux:./gradlew processResources). It should finish with theBUILD SUCCESSFULmessage.
This will generate all resources required by the application and tests. -
Open link:
MainWindow.javaand check for any code errors-
Due to an ongoing issue with some of the newer versions of IntelliJ, code errors may be detected even if the project can be built and run successfully
-
To resolve this, place your cursor over any of the code section highlighted in red. Press ALT+ENTER, and select
Add '--add-modules=…' to module compiler optionsfor each error
-
-
Repeat this for the test folder as well (e.g. check link:
HelpWindowTest.javafor code errors, and if so, resolve it the same way)
1.3. Verifying the setup
-
Run the
seedu.knowitall.MainAppand try a few commands -
Run the tests to ensure they all pass.
1.4. Configurations to do before writing code
1.4.1. Configuring the coding style
This project follows oss-generic coding standards. IntelliJ’s default style is mostly compliant with ours but it uses a different import order from ours. To rectify,
-
Go to
File>Settings…(Windows/Linux), orIntelliJ IDEA>Preferences…(macOS) -
Select
Editor>Code Style>Java -
Click on the
Importstab to set the order-
For
Class count to use import with '*'andNames count to use static import with '*': Set to999to prevent IntelliJ from contracting the import statements -
For
Import Layout: The order isimport static all other imports,import java.*,import javax.*,import org.*,import com.*,import all other imports. Add a<blank line>between eachimport
-
Optionally, you can follow the UsingCheckstyle.adoc document to configure Intellij to check style-compliance as you write code.
1.4.2. Updating documentation to match your fork
After forking the repo, the documentation will still have the SE-EDU branding and refer to the
cs2103-ay1819s2-w10-4/main repo.
If you plan to develop this fork as a separate product (i.e. instead of contributing to cs2103-ay1819s2-w10-4/main)
, you should do the following:
-
Configure the site-wide documentation settings in
build.gradle, such as thesite-name, to suit your own project. -
Replace the URL in the attribute
repoURLin link:DeveloperGuide.adocand link:UserGuide.adocwith the URL of your fork.
1.4.3. Setting up CI
Set up Travis to perform Continuous Integration (CI) for your fork. See UsingTravis.adoc to learn how to set it up.
After setting up Travis, you can optionally set up coverage reporting for your team fork (see UsingCoveralls.adoc).
| Coverage reporting could be useful for a team repository that hosts the final version but it is not that useful for your personal fork. |
Optionally, you can set up AppVeyor as a second CI (see UsingAppVeyor.adoc).
| Having both Travis and AppVeyor ensures your App works on both Unix-based platforms and Windows-based platforms (Travis is Unix-based and AppVeyor is Windows-based) |
1.4.4. Getting started with coding
When you are ready to start coding, get some sense of the overall design by reading Section 2.1, “Architecture”.
2. Design
2.1. Architecture
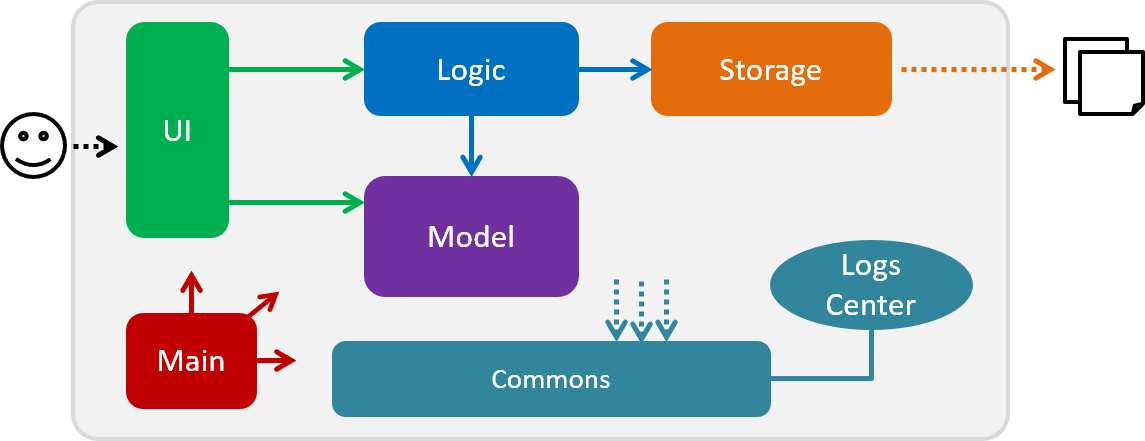
The Architecture Diagram given above explains the high-level design of the App. Given below is a quick overview of each component.
The .pptx files used to create diagrams in this document can be found in the diagrams folder. To update a diagram, modify the diagram in the pptx file, select the objects of the diagram, and choose Save as picture.
|
Main has only one class called link: MainApp. It is responsible for,
-
At app launch: Initializes the components in the correct sequence, and connects them up with each other.
-
At shut down: Shuts down the components and invokes cleanup method where necessary.
Commons represents a collection of classes used by multiple other components.
The following class plays an important role at the architecture level:
-
LogsCenter: Used by many classes to write log messages to the App’s log file.
The rest of the App consists of four components.
Each of the four components
-
Defines its API in an
interfacewith the same name as the Component. -
Exposes its functionality using a
{Component Name}Managerclass.
For example, the Logic component (see the class diagram given below) defines it’s API in the Logic.java interface and exposes its functionality using the LogicManager.java class.

How the architecture components interact with each other
The Sequence Diagram below shows how the components interact with each other for the scenario where the user issues the command delete 1.
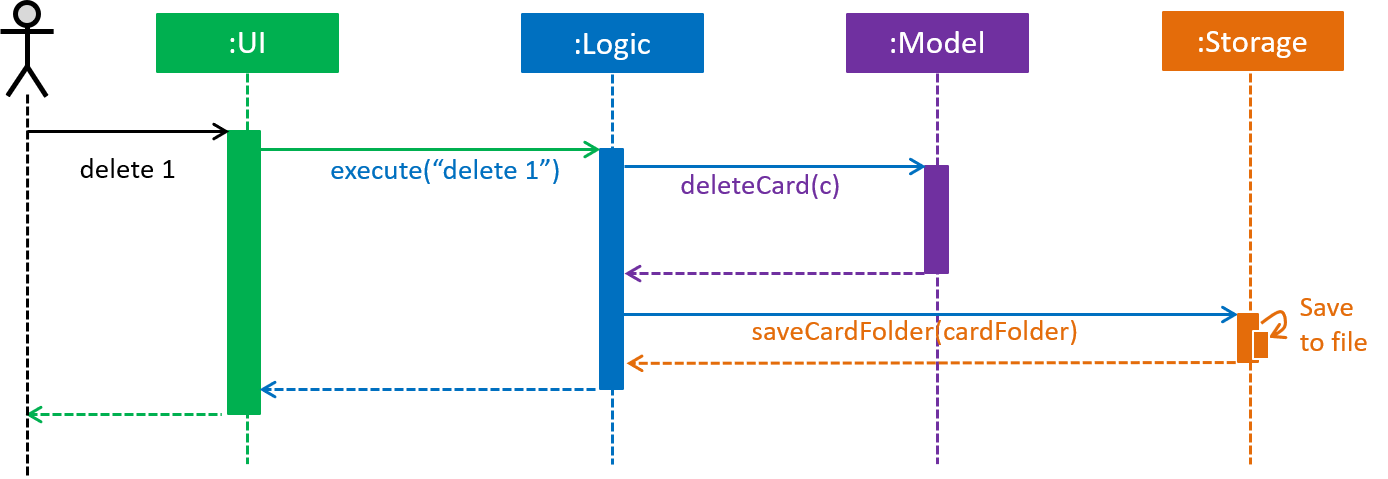
delete 1 commandThe sections below give more details of each component.
2.2. UI component
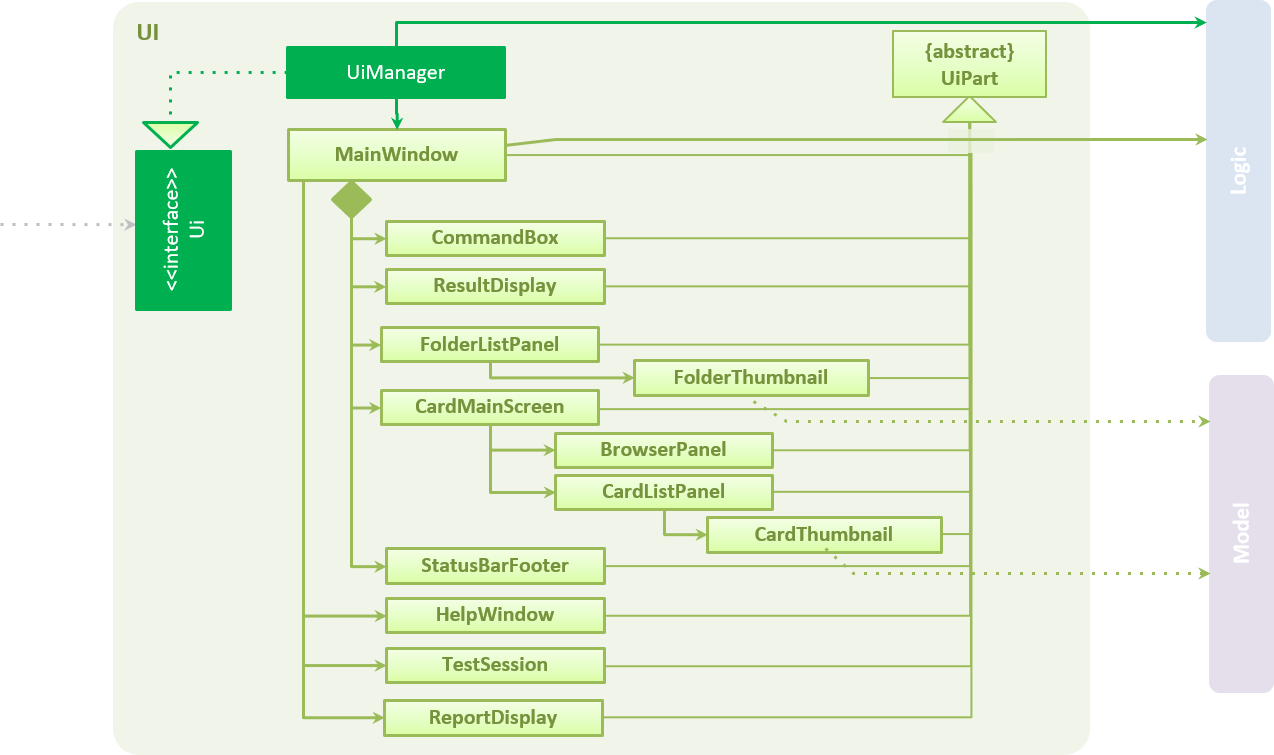
API : Ui.java
UI consists of a MainWindow made up of many parts as seen above e.g.CommandBox, ResultDisplay, CardMainScreen,
StatusBarFooter, BrowserPanel etc. All these parts, including the MainWindow, inherit from the abstract UiPart
class.
The UI component uses JavaFx UI framework.
The layout of these UI parts are defined in matching .fxml files located in the src/main/resources/view folder.
For example, the layout of the link: MainWindow is
specified in link: MainWindow.fxml
The UI component,
-
Uses
Logiccomponent to execute user commands. -
Listens for changes to
Modeldata to update UI with the modified data.
2.3. Logic component
API : Logic.java
-
Logicuses theCardFolderParserclass to parse the user command. -
This results in a
Commandobject which is executed by theLogicManager. -
The command execution can affect the
Model(e.g. adding a card). -
The result of the command execution is encapsulated as a
CommandResultobject which is passed back to theUi. -
In addition, the
CommandResultobject can also instruct theUito perform certain actions, such as displaying help to the user.
Given below is the Sequence Diagram for interactions within the Logic component for the execute("delete 1") API call.
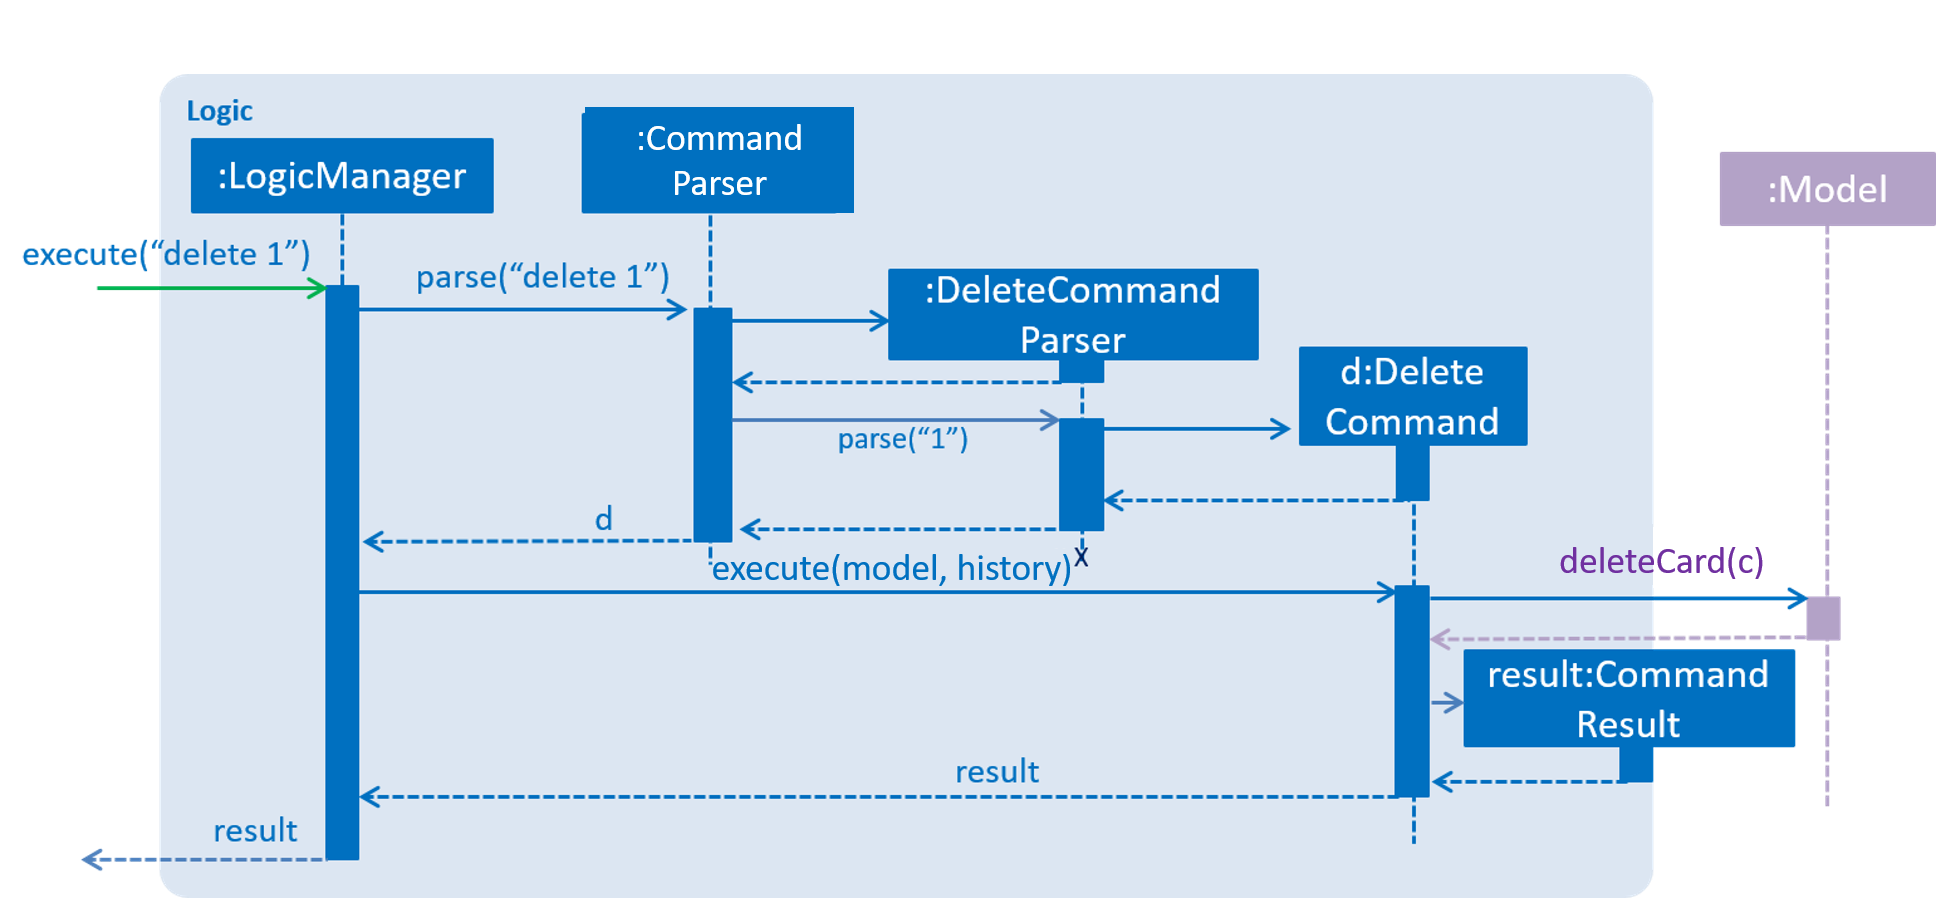
delete 1 Command2.4. Model component
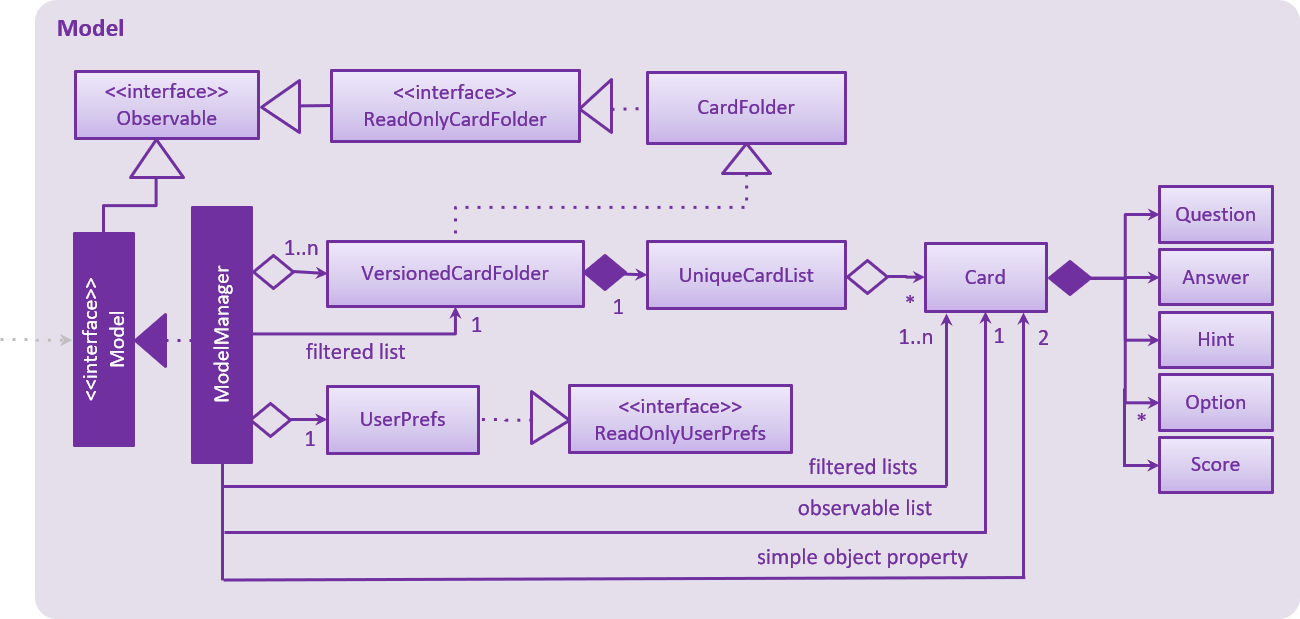
API : Model.java
The Model,
-
stores a
UserPrefobject that represents the user’s preferences. -
stores a list of
VersionedCardFoldersrepresenting the folders that the user has. TheseVersionedCardFoldersin turn each store a list ofCards. EachCardstores information about a single question. -
exposes unmodifiable instances of
FilteredList<Card>andFilteredList<VersionedCardFolder>that can be 'observed' e.g. the UI can be bound to this list so that the UI automatically updates when the data in the list change. -
exposes two instances of
SimpleObjectProperty<Card>, which represent the current cards being selected and being tested, if any. -
does not depend on any of the other three components.
As a more OOP model, we can change the Card implementation to be that of a parent class, from which 2 subclasses, SingleAnswerCard and McqCard can inherit from. This would eliminate the need for the Card class to maintain a Set of MCQ Options even if it is a Single-answer card. An example of how such a model may look like is given below.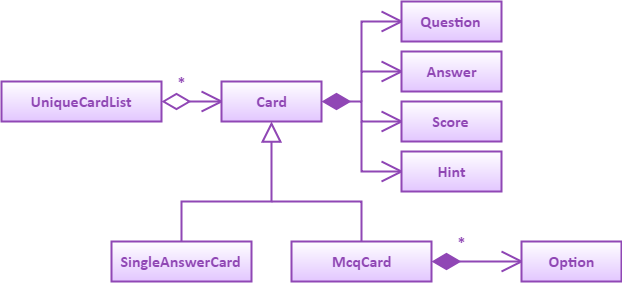
|
2.5. Storage component
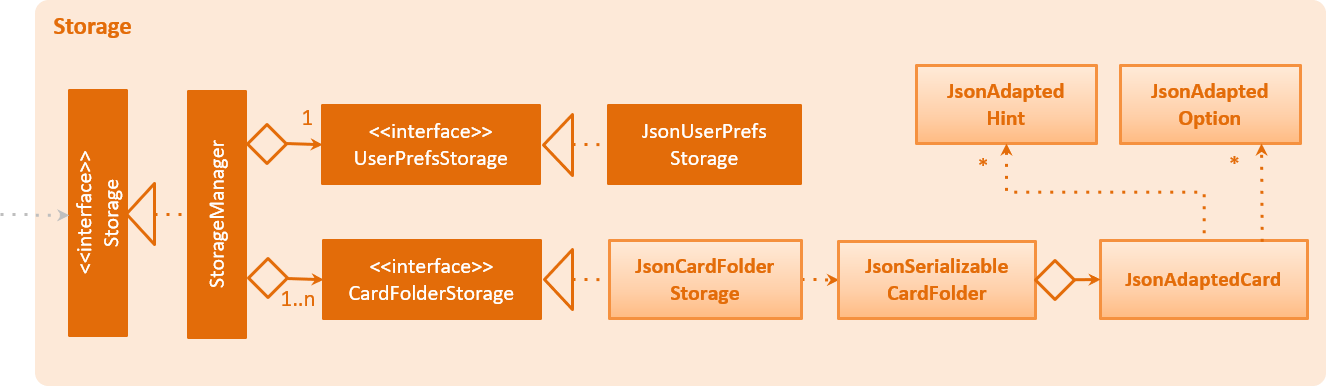
API : Storage.java
The Storage component,
-
can save
UserPrefobjects in json format and read it back. It maintains a single instance ofUserPrefStorage. -
can save
CardFolderdata in json format and read it back. It holds a list ofCardFolderStorageobjects, each handling the storage functions of a singleCardFolder.
2.6. Common classes
Classes used by multiple components are in the seedu.knowitall.commons package.
3. Implementation
This section describes some noteworthy details on how certain features are implemented.
3.1. Cards
3.1.1. Current Implementation
The Card is one of the core aspects of the application. Cards are the result of morphing the Person class from the original AddressBook model. This implementation incorporates the Model and Logic components.
Model
To allow users to manage Cards, the following methods are available via the Model component:
-
ModelManager#addCard(Card card)- Adds a new card to the currently activeVersionedCardFolderfolder -
ModelManager#setCard(Card target, Card editedCard)- Edits the information of a target card in the currently active folder -
ModelManager#deleteCard(Card target)- Deletes the target card from the currently active folder -
ModelManager#hasCard(Card card)- Checks if a card is already present in the currently active folder
Logic
As with all other commands, the LogicManager#execute(String commandText) method of the Logic component parses the user’s input, say a command to add a new card, and executes the corresponding Command.
Example Usage
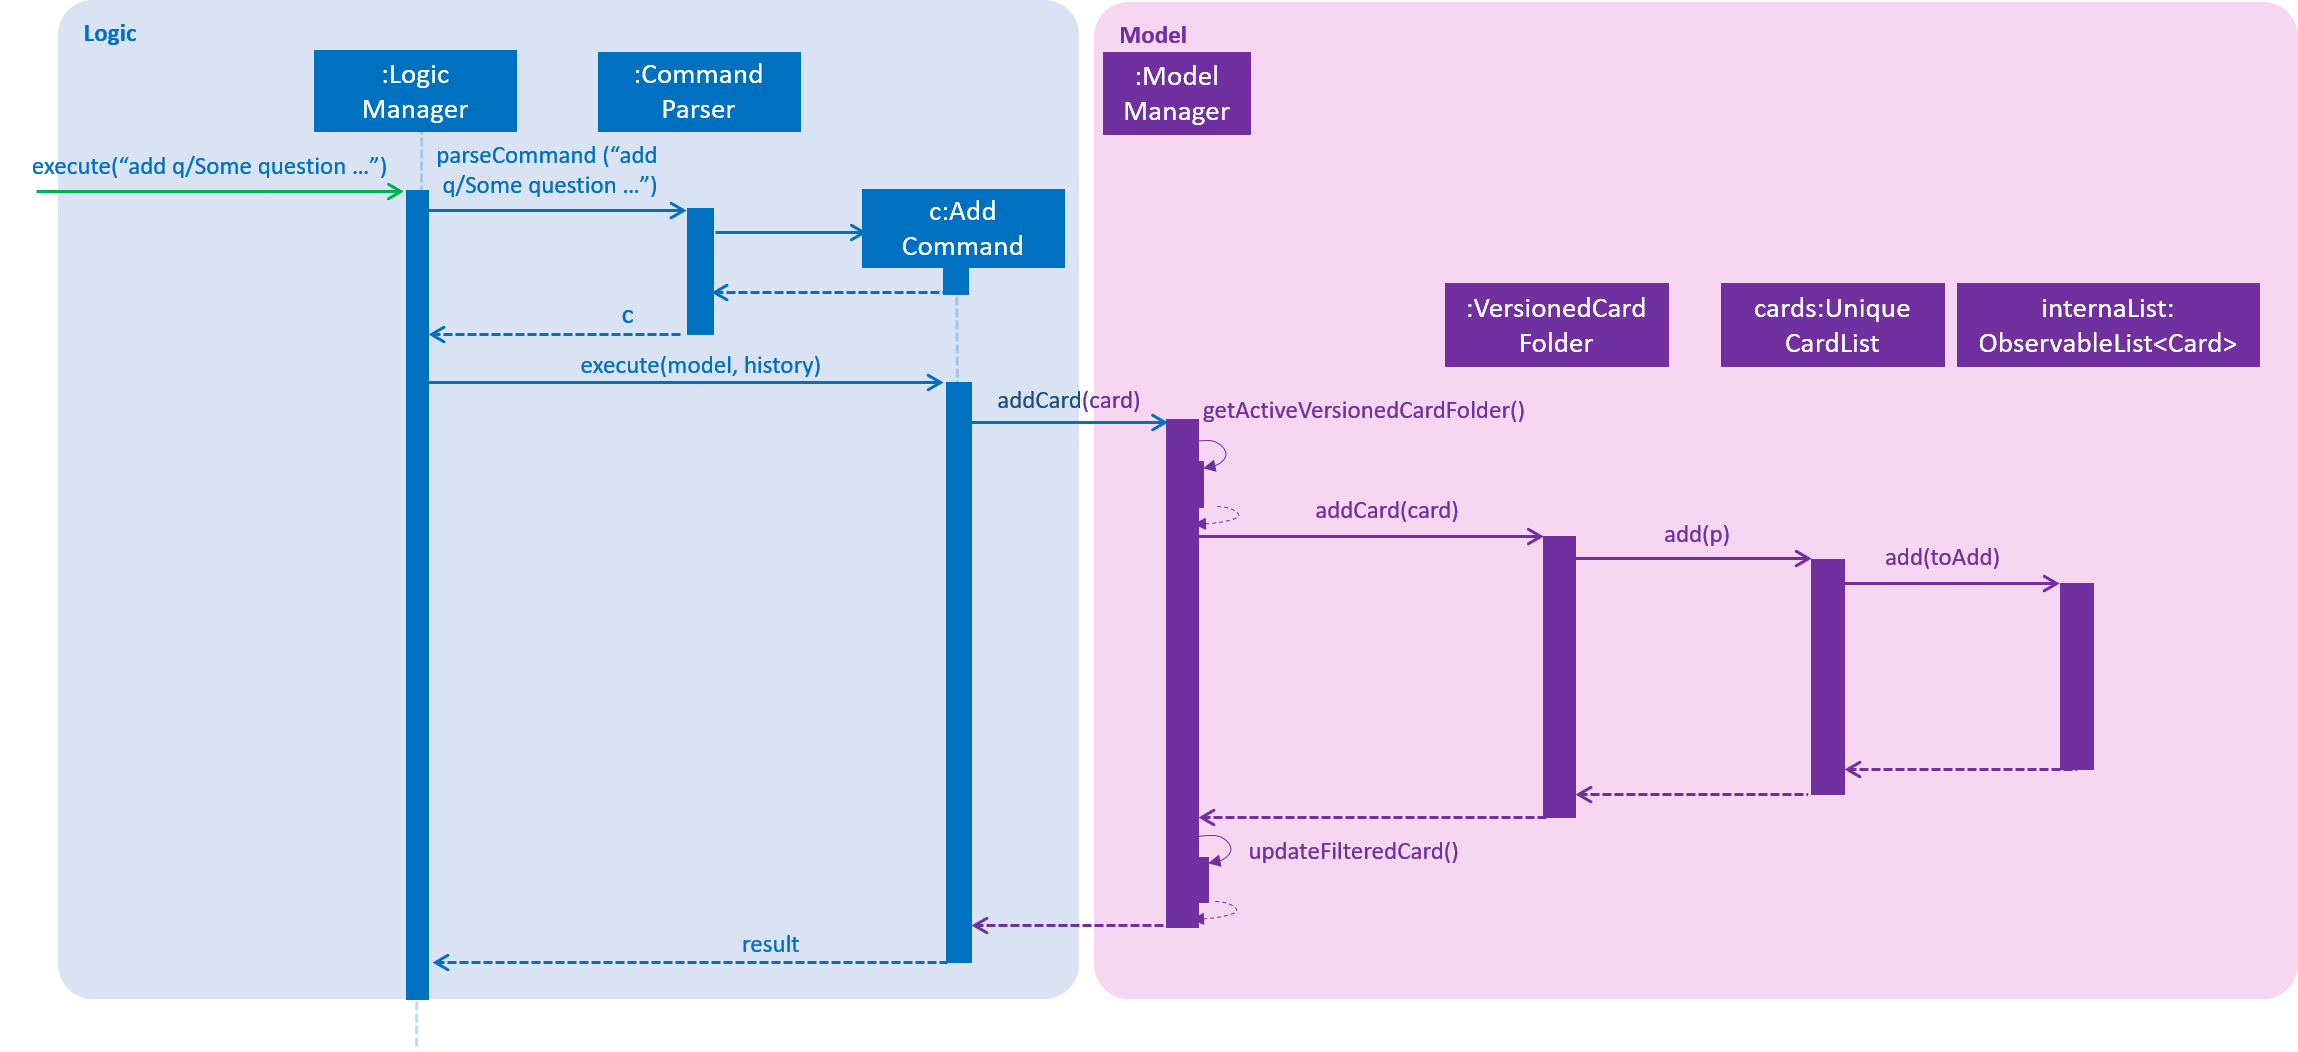
The following steps detail the underlying logic executed when a user does a card-related operation, say an add card operation.
-
User is in the
Organsfolder and wants to add a new card, with question 'What is the largest organ?' and answer 'Skin'. This is done by typingadd q/What is the largest organ? a/Skin.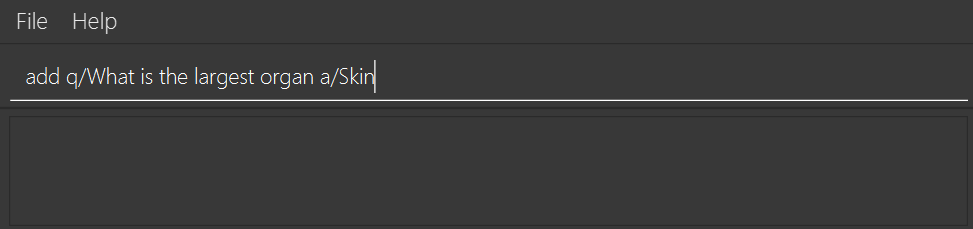
-
The command parser reads the string input (as entered by the user) and returns the corresponding
Command, anAddCommandobject in this instance. -
Upon execution, the
AddCommandchecks if the card to be added is already present in the current folder. If so, an exception is thrown. -
The
AddCommandthen calls theModelManager#addCard(Card card)method. -
The new card will then be added to the active
VersionedCardFolder. -
If the user is not inside a folder, or if the card to add already exists inside the current folder, the
addCommandwill throw aCommandException.
The following sequence diagram demonstrates how AddCommand works.
3.1.2. Design Considerations
Aspect: How to represent options for MCQ cards
-
Alternative 1 (current choice): Maintain a set of
Optionobjects to represent incorrect options, separate from theAnswerfield of eachCard.-
Pros: Simple to implement, easy to convert the card type between MCQ and Single-answer, requires the least amount of implementation changes to
Card. -
Cons: Single-answer cards still have to maintain an empty
Optionset.
-
-
Alternative 2: Maintain 2 separate subclasses of
Card, one for Single-answer and another for MCQ.-
Pros: More object-oriented implementation.
-
Cons: Harder to implement.
-
3.2. Score feature
3.2.1. Current Implementation
To implement tracking of the number of correct and incorrect attempts, a new attribute Score was added to Card.
Score keeps track of both numbers.
This attribute is encapsulated in the Score class.
3.2.2. Design Considerations
Aspect: How to represent score
-
Alternative 1 (current choice): Track total number of correct attempts and total number of attempts
-
Pros: Simple to implement. Most semantically correct.
-
Cons: Score will be rolling average. If the question is answered wrongly even once, the score can never be 100%.
-
-
Alternative 2: Track only last X attempts.
-
Pros: An improvement in performance will be more obvious.
-
Cons: Uses more memory. Have to delete the X+1th score every time a new score is added.
-
Aspect: How to read/write score from file
-
Alternative 1 (current choice): Read/write as
String.-
Pros: `String`s are easier to read/write to file.
-
Cons: There must be strict checks when instantiating score from strings as they are prone to many kinds of formatting errors.
-
-
Alternative 2: Read/write as a double.
-
Pros: A
doublecan represent both numbers with just one, which then can be converted toString. -
Cons: When instantiating score from double, it might be simplified. For example, 2 correct attempts and 4 total attempts becomes 0.5. When instantiating from double, it is interpreted as 1 correct attempt and 2 total attempts.
-
-
Alternative 3: Read and write both numbers as integers.
-
Pros: Most correct implementation.
-
Cons: Reading/writing to file now needs to take into account this fact. The
toString()method cannot be used to write to file.
-
3.3. Report feature
3.3.1. Current Implementation
The report feature is meant to provide the user with the ability to look back and compare their test score from previous test sessions. It makes use of Java FXML features to display scores in a user-friendly manner. The following methods are used to enter or exit the report display:
-
Model#enterReportDisplay()— Enters the report display for this folder. -
Model#exitReportDisplay()— Exits the report display back into the folder.
Here is a screenshot of how it looks:
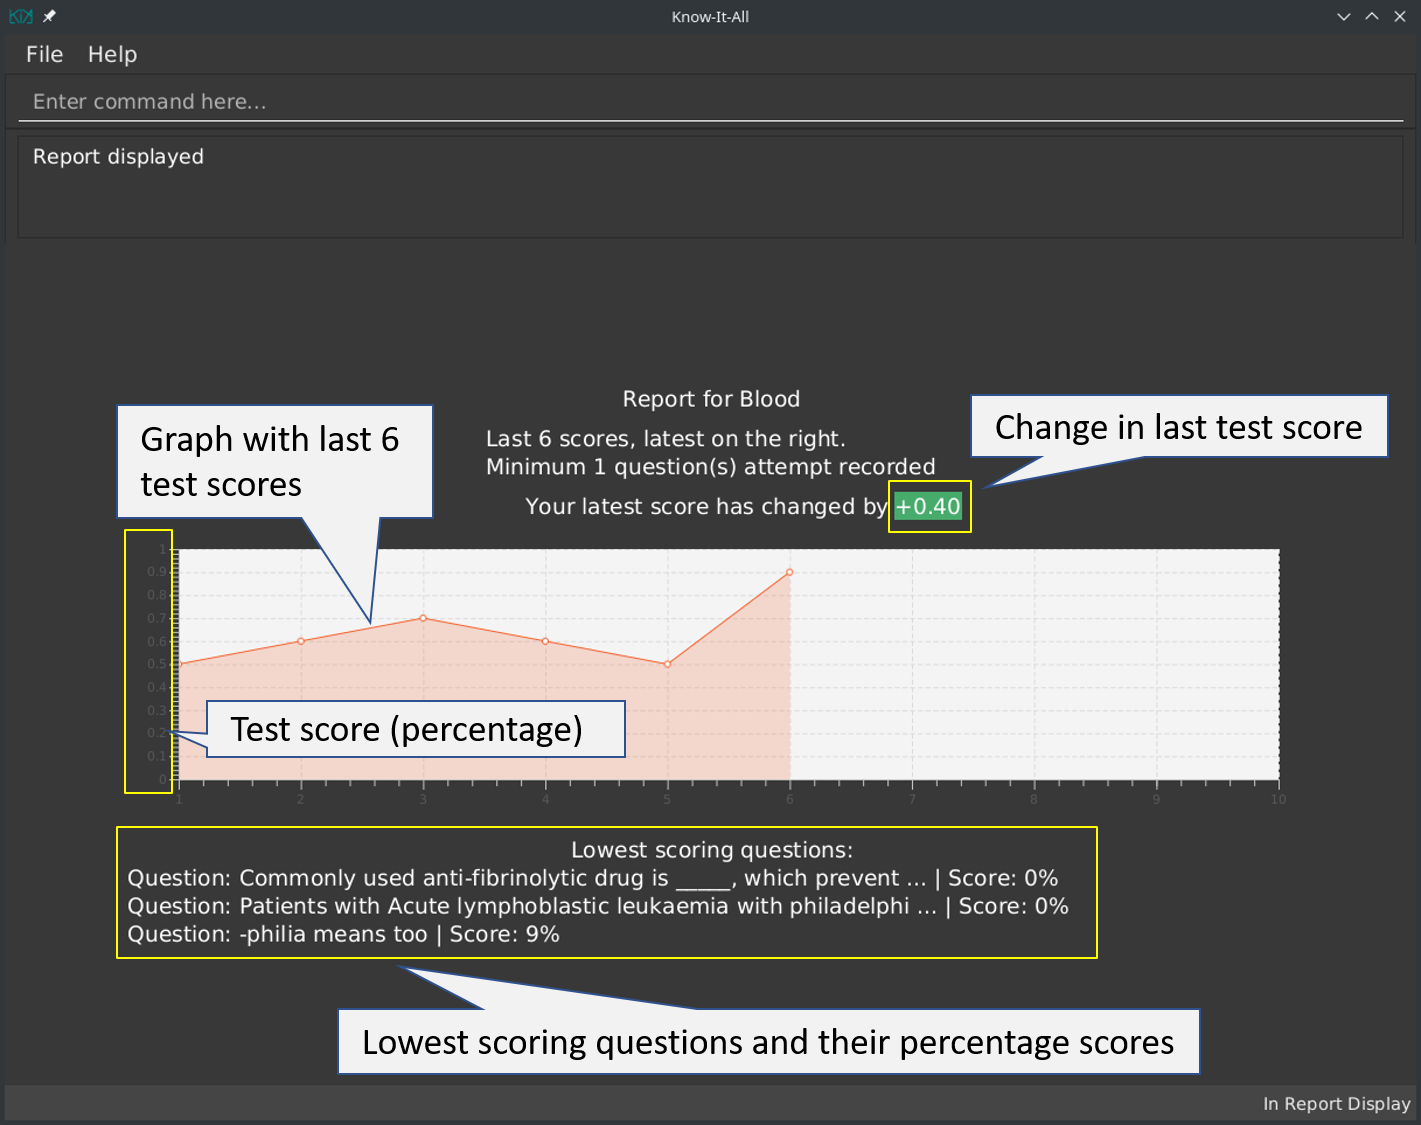
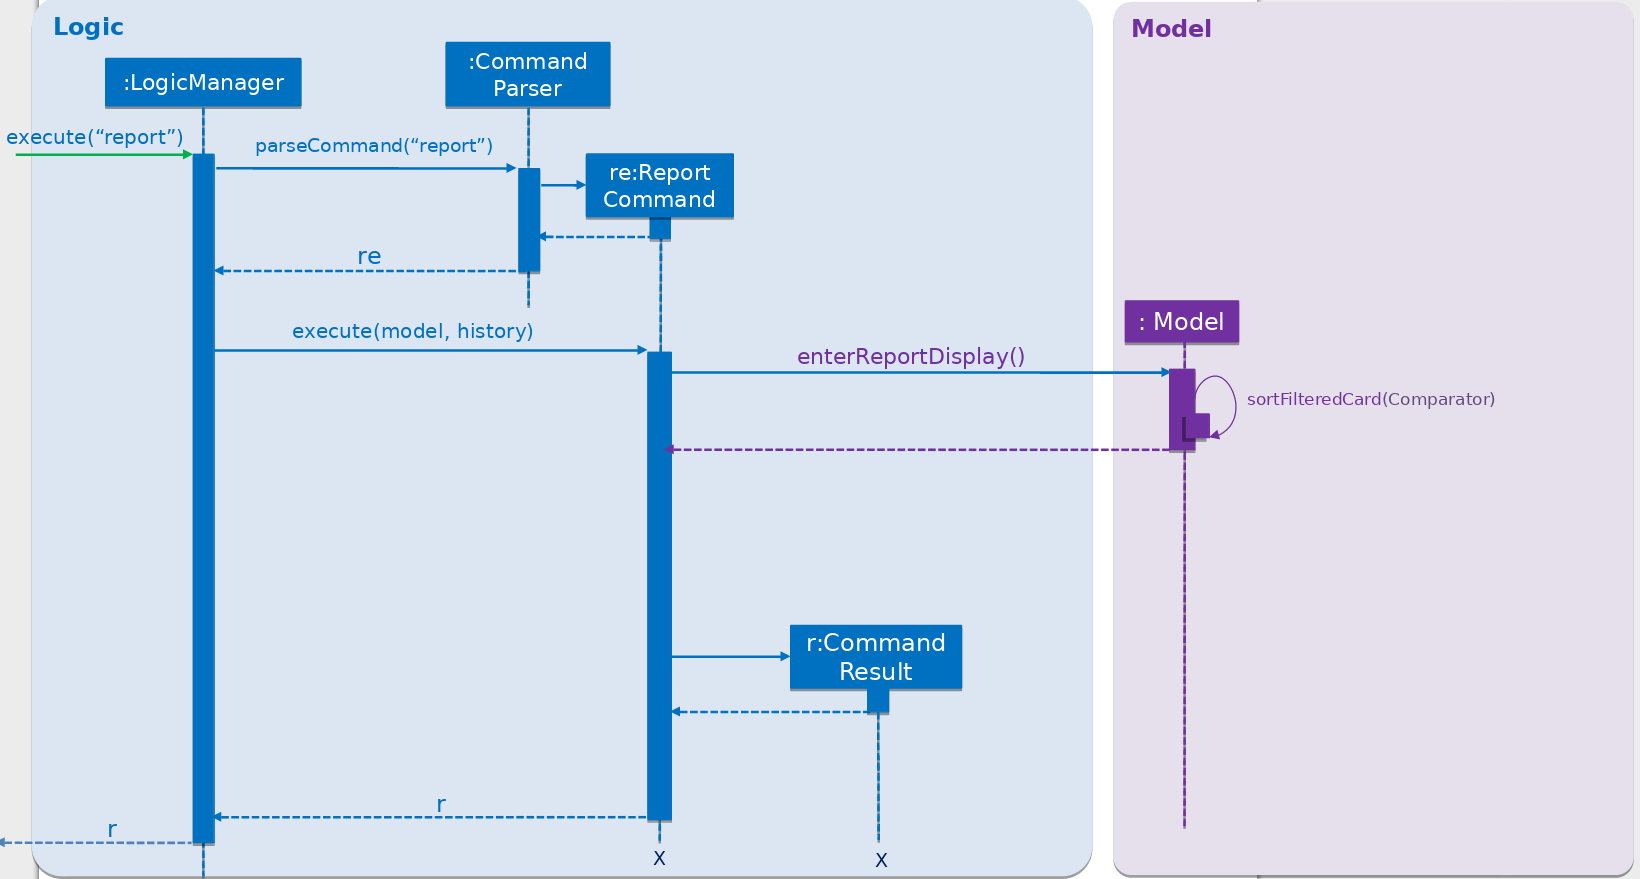
Given below is an example usage scenario and how the report display is rendered.
Step 1. The user is in a folder and wishes to see a report by executing report.
Step 2. A ReportCommand is created and executed by LogicManager. Model#enterReportDisplay() is called, which prepares
the model for report by sorting the cards by lowest scores first. The state is also checked to make sure the user is in
a folder.
Step 3. A CommandResult with type ENTERED_REPORT is returned by the ReportCommand.
Below is a sequence diagram, summarizing the above operations.
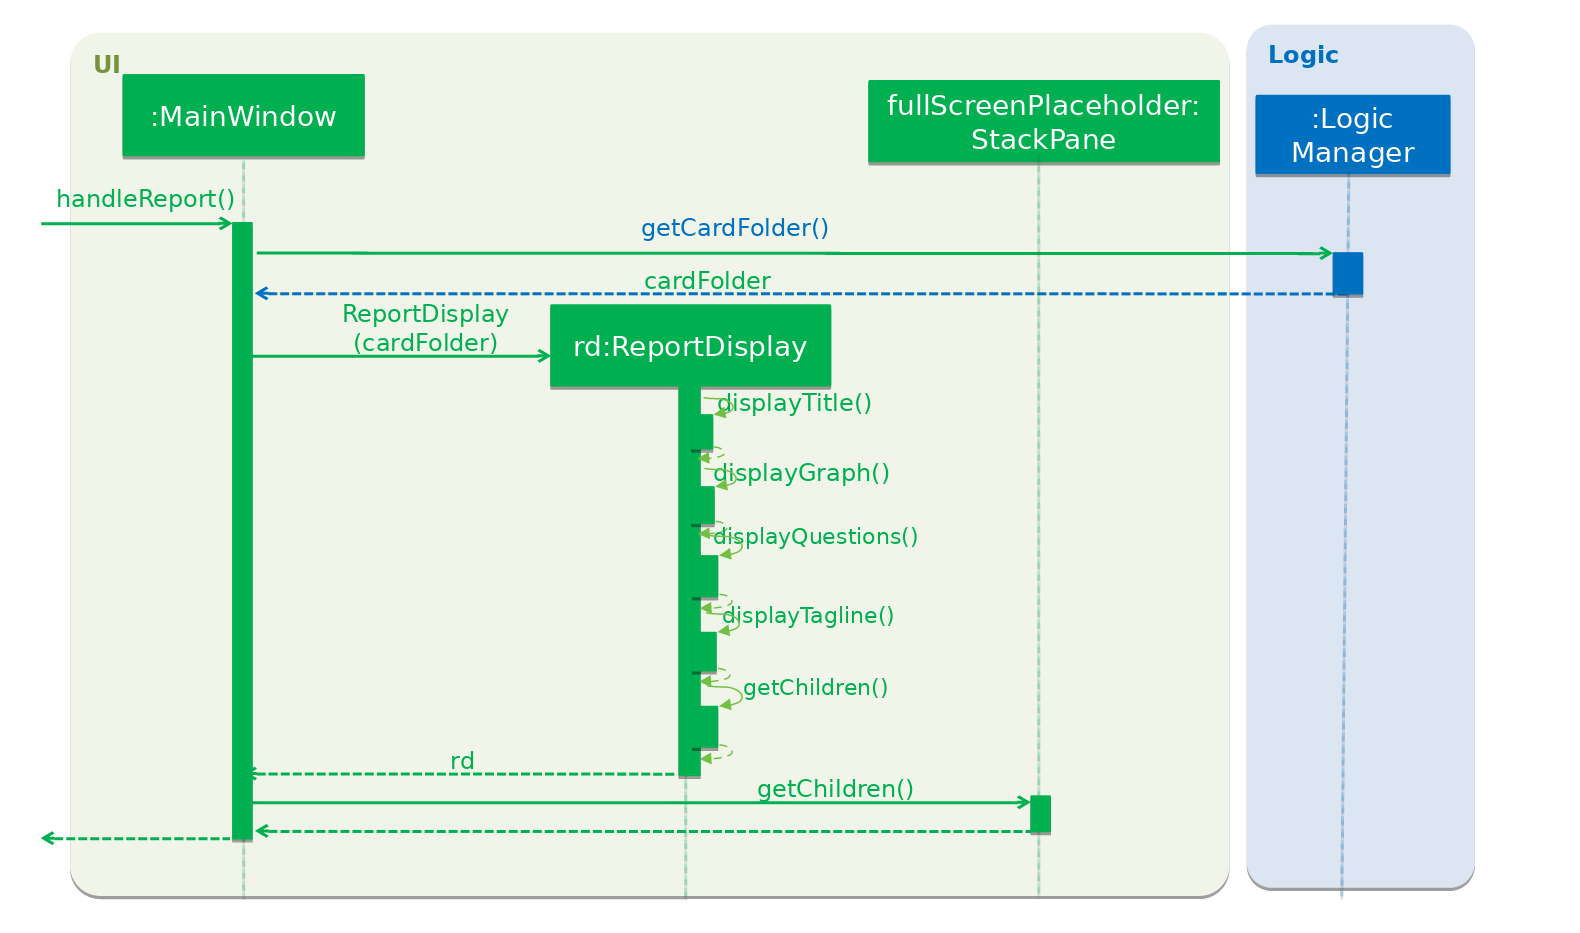
Step 4. The CommandResult is passed to UI, which now has to render the new screen. It does so by getting the current
CardFolder from Model, then instantiating a ReportDisplay with it. ReportDisplay prepares several elements for
display by Java FXML, split by their content:
-
ReportDisplay#displayTitle()— Displays title and how many test scores were recorded. -
ReportDisplay#displayGraph()— Takes maximum of last 10 test scores fromCardFolder, and adds them as points on the Java FXMLAreaChart. -
ReportDisplay#displayQuestions()— Displays maximum of 3 questions fromCardFolderwhich have lowest the individual card scores. -
ReportDisplay#displayTagline()— Calculates change in test score from last and second last test session (if available) and formats it in a user-friendly manner.
Step 5. The ReportDisplay is rendered by fullScreenPlaceholder.
Below is a sequence diagram summarizing steps 4 and 5. The interactions with Java FXML elements are omitted for clarity.
3.3.2. Design Considerations
Aspect: How to display test scores
-
Alternative 1 (current choice): Display previous test scores in a graph and lowest scoring cards
-
Pros: Has benefits of seeing the graph as well as knowing which cards the user needs help in.
-
Cons: More performance and memory intensive. Screen may get messy if there are too many items.
-
-
Alternative 2: Display previous test scores in a graph
-
Pros: More visual, easier to see change in test score.
-
Cons: More performance and memory intensive as a graph needs to be rendered. Remedy: Display only last ten.
-
-
Alternative 3: List the previous test scores
-
Pros: User can see more accurate numbers. They can also see the individual card scores, so that they can tell where they need help.
-
Cons: Hard to see change from test session to test session.
-
Aspect: Where to display test scores
-
Alternative 1 (current choice): Display in full screen, entered from card folder
-
Pros: Works because the test scores are scored by card folders.
-
Cons: Need to implement a new state for commands, because it should not be possible to do some e.g. add card while in fullscreen report.
-
-
Alternative 2: Display in right panel, with cards on the left
-
Pros: User can see all their cards at the same time.
-
Cons: Less space to render report details such as graph.
-
3.4. State
3.4.1. Current Implementation
Model
Previously, Model did not have a concept of state as there was only one screen where the user could be. But as Know-It-All grew, there are more screens that a user can be in and more commands that can only be executed in certain screens. Thus there is a need to manage the state in Model.
3.4.2. Design Considerations
Aspect: How to manage state
-
Alternative 1 (current choice): Use enum of States
-
Pros: Fixes the states that Model can be in. By design, only one state can be true at any point in time, if state is set to type State which is a enum.
-
Cons: Need to add new states to enum.
-
-
Alternative 2: Use Strings
-
Pros: No need to define new states. Trivial to change into new state: Simply set state to "folder", or "homeDir". Easy to check as well, e.g. to Check state == "folder".
-
Cons: Becomes very unsafe as even a typo would mean entering a state that other parts of the application would not understand. e.g. Setting state to "Folder" instead of "folder".
-
-
Alternative 2: Use boolean flags
-
Pros: Easy to manipulate. Clear when there are only two states.
-
Cons: Becomes very messy when there are more states, since there is a need to ensure that only one boolean flag is true at any point in time. E.g., only one of inFolder, inHomeDir, inTest… can be true.
-
3.5. Import/Export feature
Current Implementation
The Import and Export feature is facilitated by the Logic and model components, together with the addition of 3 new classes inside the csvmanager package defined under the storage package.
Logic
Similar to how the current commands are implemented, where each specific command inherits from the abstract class command, the Import and Export command likewise inherit from the command class.
Model
The model component supports the addition of a new object attribute CsvManager, that carries out the read and
write logic of cards to external files.
Additionally, model implements two new methods, Model#importCardFolders and Model#exportCardFolders.
These two methods further call the CsvManager API to read and write card folders.
Model also implements Model#setTestCsvPath and the Model#getDefaultPath which are only used during testing.
csvmanager package:
The csvmanager package contains all classes dealing with the reading and writing of card folders into and out to the model.
The classes include:
-
CsvManager- Main class responsible for the writing and reading of .csv files during the import and export of files -
CsvFile- Wrapper class for file name input by user -
CsvCommandsinterface - API for import/export method in CsvManager -
CsvUtils- Utility class containing the default path and test paths used by the application.
The main logic for the import / export command is carried out inside the CsvManager class specified by it’s
API CsvManager#writeFoldersToCsv and CsvManager#readFoldersToCsv.
Example Usage
-
User wants to export folders Human Anatomy and Nervous System. Suppose that these two folders index as shown on the main application screen is 1 and 3 respectively. The user types
export 1 3 -
The Export command parser extracts the indices, stores the indices into a
List<Integer>andExportCommandobject, which keeps track of the indices. -
The Export command calls executes, resulting in a call to the
Model#exportCardFoldersmethod. -
Model#exportCardFoldersmethod checks that all card folders specified by user exists within the model. With reference to the diagram below, we can see that the indices specified by the user (1 and 3) corresponds to the (i - 1) th indexes of the list of card folders in the model, where 1 < i ⇐ no.of card folders in model.
The method throwsCardFolderNotFoundExceptionif card folder index is not found in list.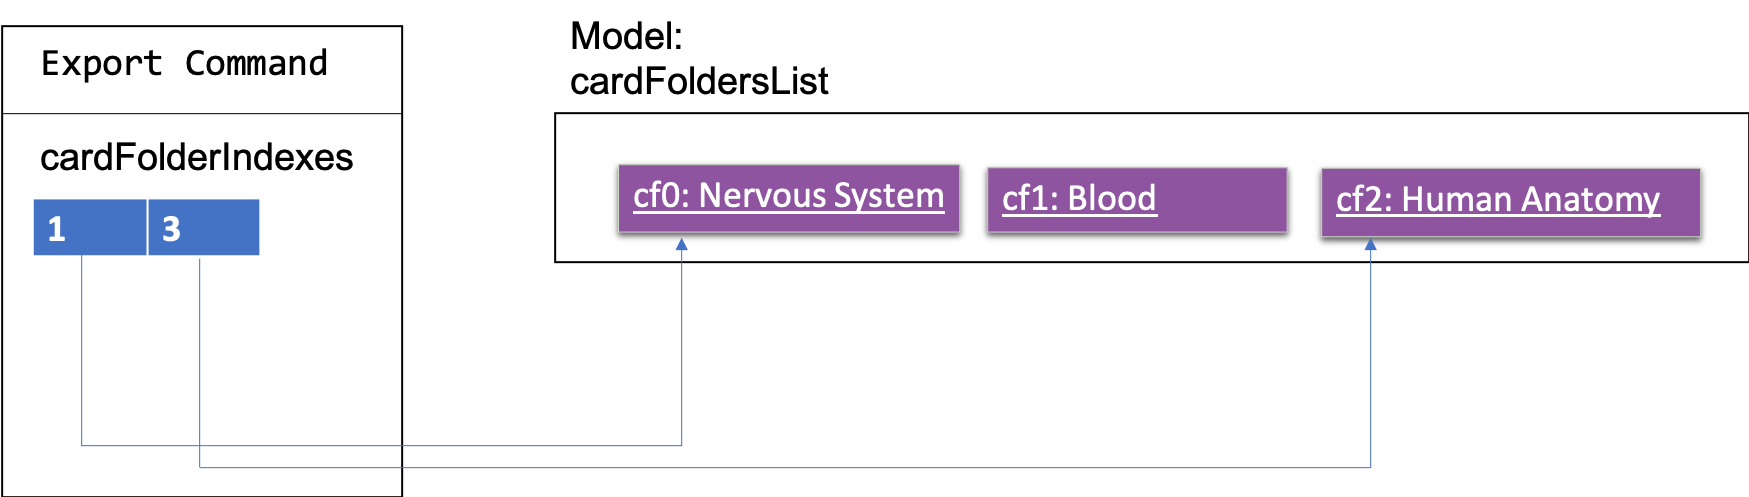
-
CsvManageris called to carry out the main logic of writing the card folders to file. File exported will be created in the project root directory.
Names of the files created will correspond to the names of their corresponding card folders.
i.eHuman Anatomy.csvandNervous System.csv -
User wants to import
Human Anatomy.csvfile.Human Anatomy.csvfile contains flashcards represented in csv file format. User typesimport Blood.csvcommand -
Import command parser extracts file name, wraps file into a
CsvFileobject and parses theCsvFileobject into an Import Command object. -
Logic unit executes the import command. The execute method makes a call to
Model#importCardFoldermethod. The model checks that the card folder to import does not already exist within the model. ThrowsDuplicateCardFolderExceptionif card folder already exists. -
CsvManager is called to carry out the main logic of reading card folders to file. File imported will be serialized into a
CardFolderobject and added to thefoldersvariable in model.
| Both Imported and Exported files have to be placed in the project root directory. |
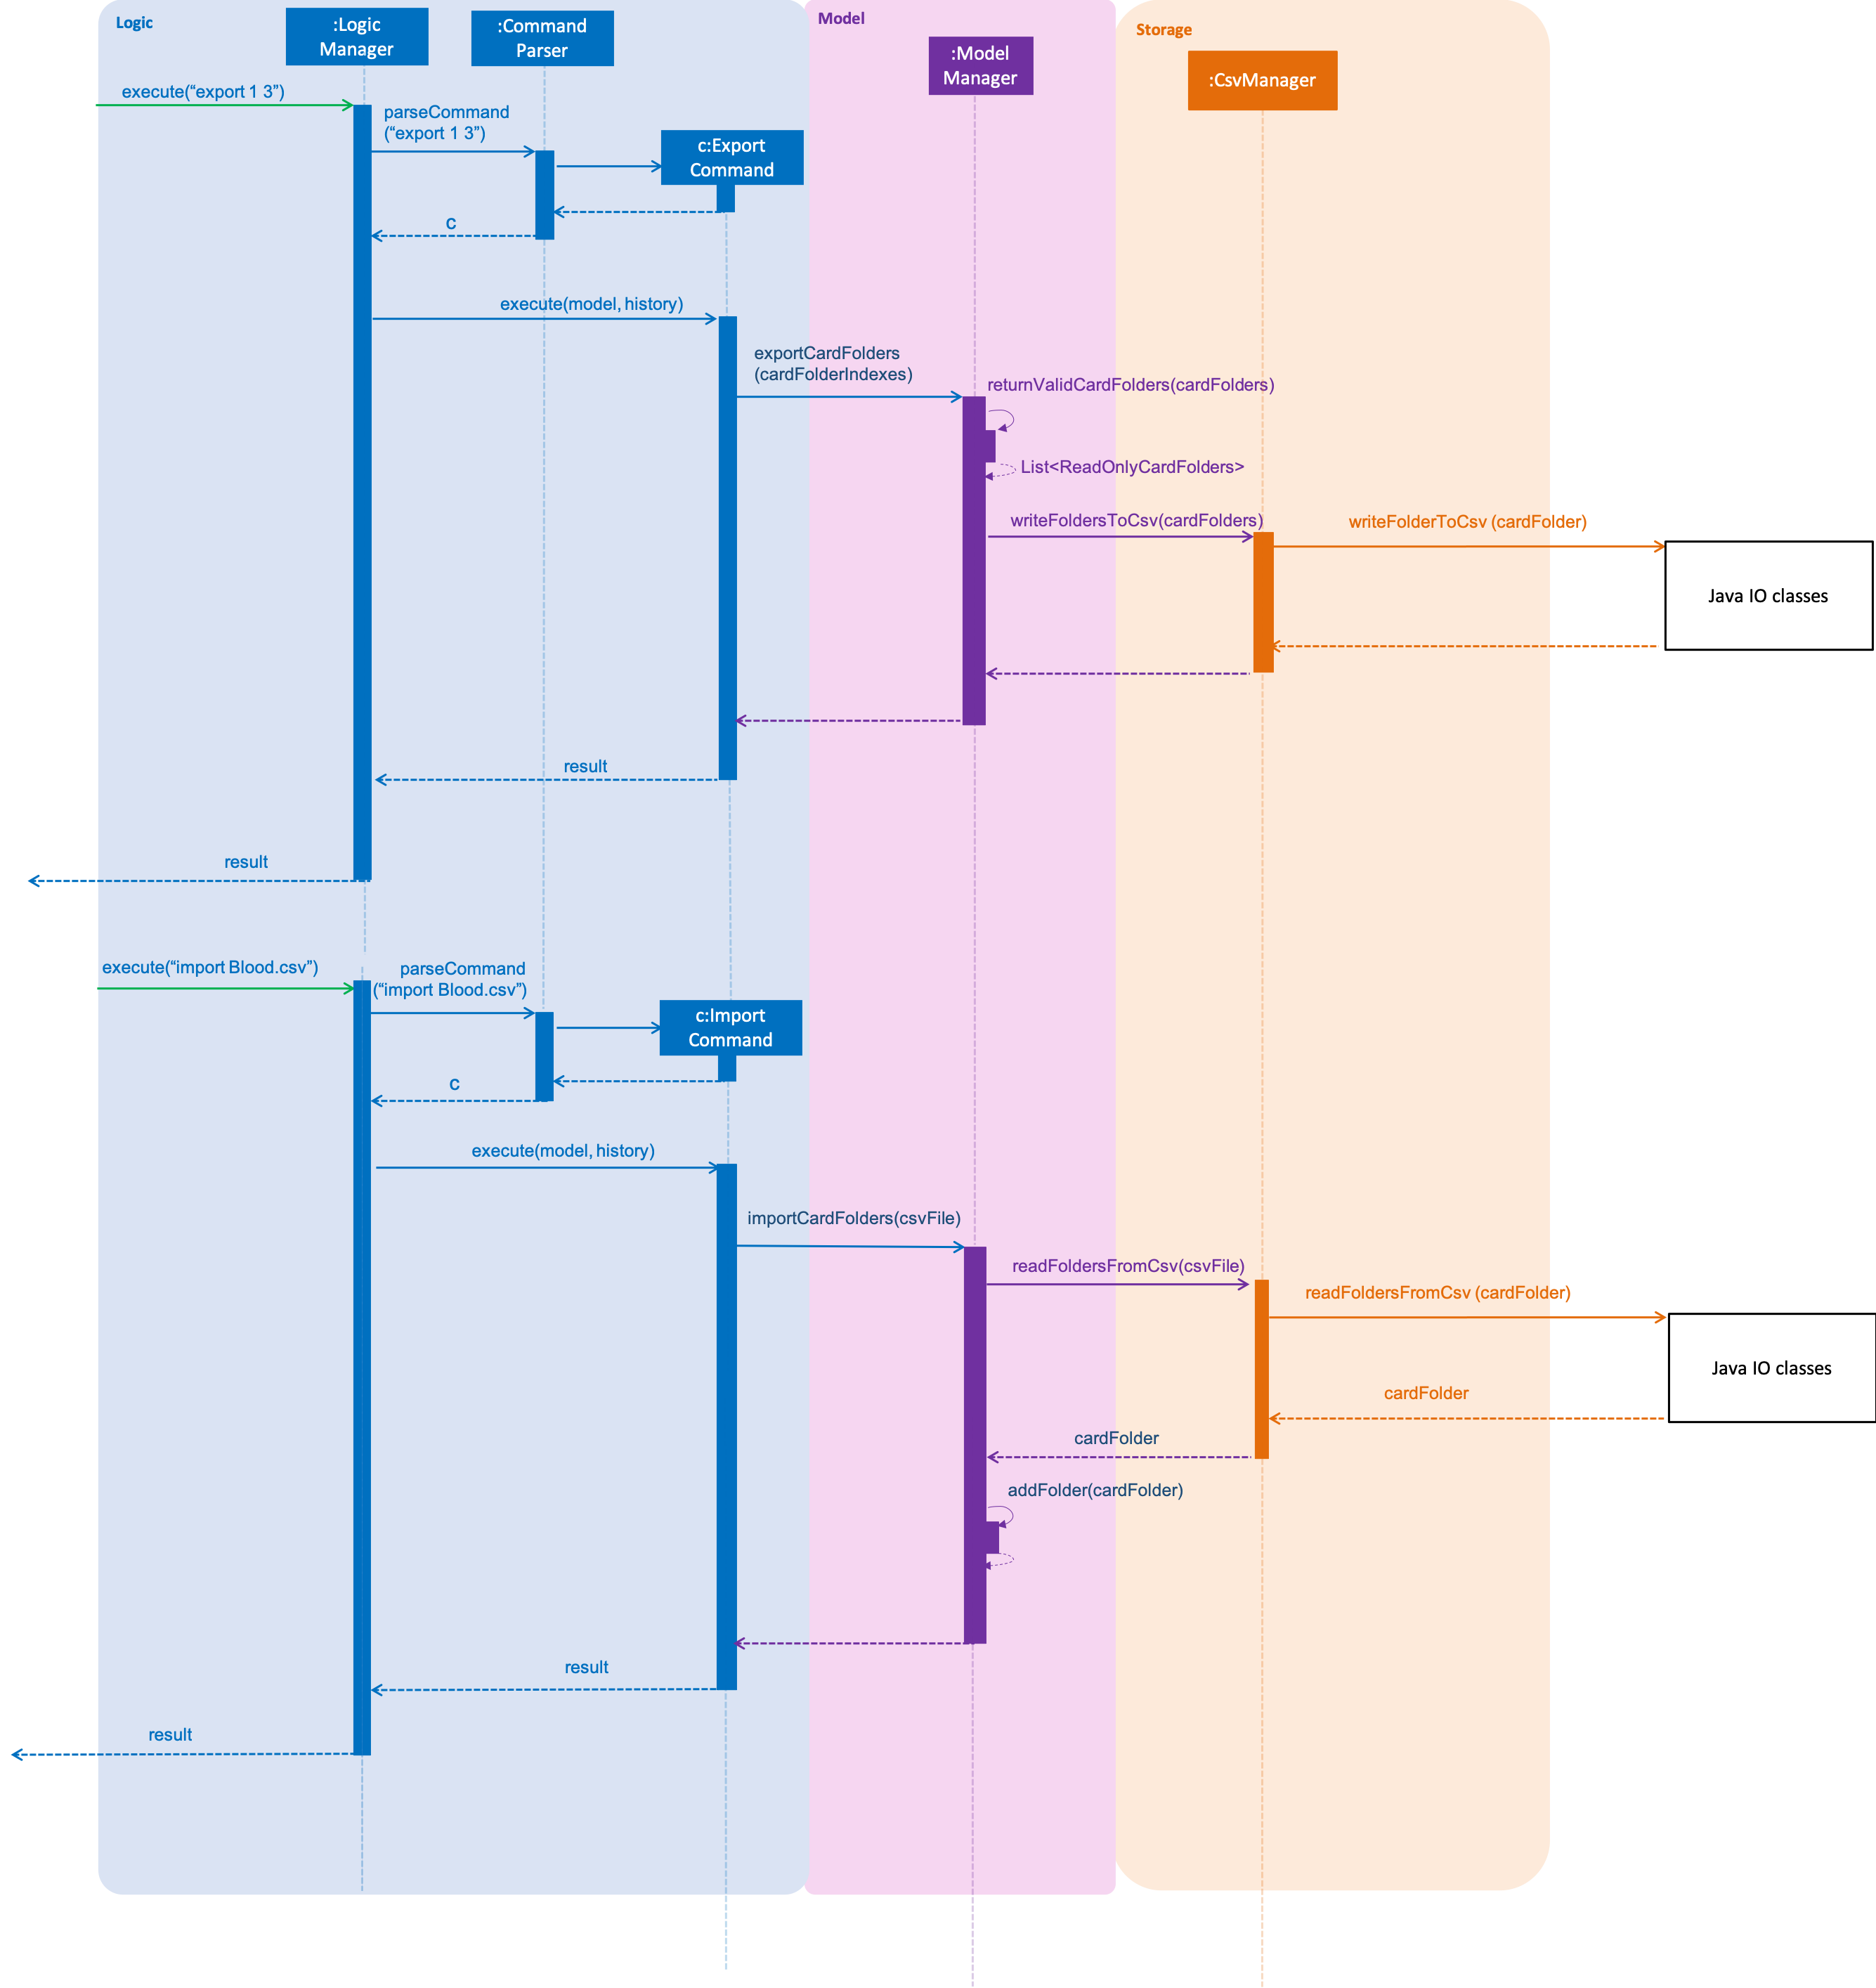
The below diagram shows the sequence diagram for the Import/Export commands
3.5.1. CSV file structure
Example of a common cardfolder csv file, opened using microsoft excel.
Blood.csv

-
The first line of any file contains the headers for each card. These headers have to be present in the csv file. If not the import would not work.
-
Each row of the csv file starting from the second, represents a single flashcard.
-
Option headers i.e (Option,Option,Option) can be left blank or take on 1 value.
-
Hints header can take either 0 or 1 value.
3.5.2. Design Considerations
Aspect: Which component responsible for import/export logic
-
Alternative 1 (current choice): Implement read and write card folders in StorageManager class
-
Pros: The most intuitive solution, since Storage involves read and write logic
-
Cons:
-
Either Logic and Model will be more coupled with storage. Storage also has more than one responsibility now.
-
-
-
Alternative 2:Implement read/write and other logic in another class. (Current)
-
Pros: Separate responsibilities of both Storage and Model. Model class can focus on the representation of the in-memory card folders and Storage class can focus on managing the internal card folder data (.json files)
-
Cons: More code to write. Storage class could possibly call the relevant API’s to convert .json file into .csv file
-
Aspect: Csv file design structure
-
Alternative 1: Export multiple card folders into a single file.
-
Pros: Saves user trouble of calling multiple import for files.
Each card folder is separated by a new line. -
Cons: Not a .csv file anymore. First line header would now specify cardfolder name before card headers, leading to unequal rows and columns
-
-
Alternative 2: Export each card folder into a single file (Current)
-
Pros: More flexibility for users to import desired card folders, since 1 cardfolder = 1 csv file. Files are also now correctly formatted as .csv file and Storage class can focus on managing the internal card folder data (.json files)
-
Cons: Slightly more work needed to import multiple card folders.
-
3.6. Folders
3.6.1. Current Implementation
A folder is another layer of abstraction over a CardFolder. Where we dealt with a single CardFolder in previous iterations, we now have multiple CardFolders that each have their own set of Cards. Users are able to manage each CardFolder independently.
Folders in the application are achieved via enhancements from the AddressBook implementation. The changes span across all four components (UI, Logic, Model and Storage).
Model
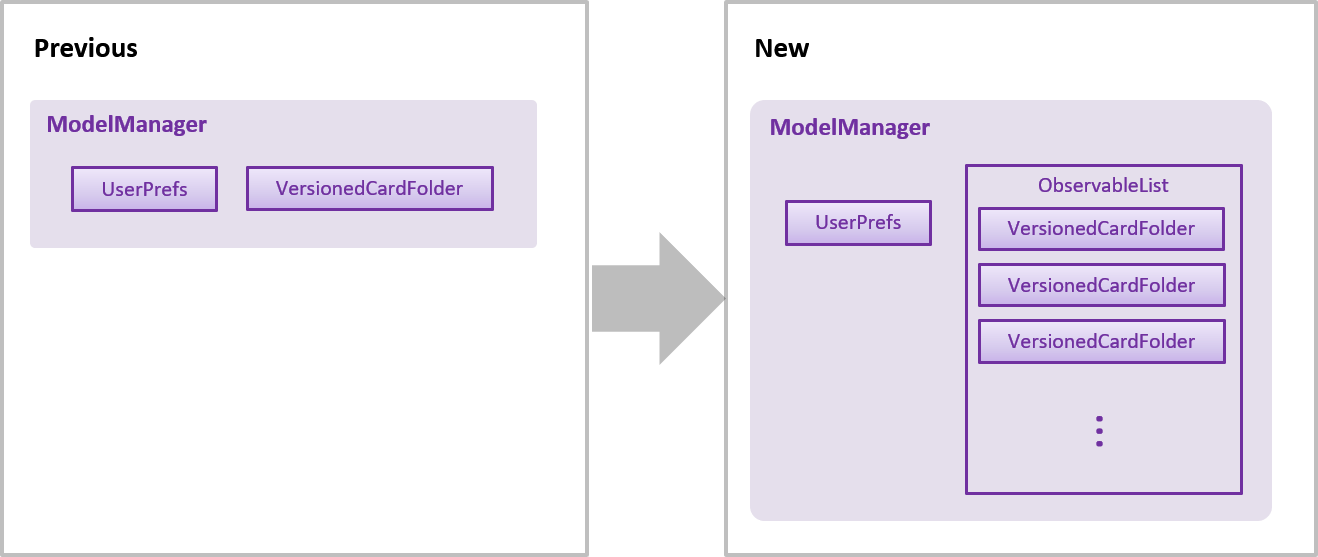
Previously, an instance of ModelManager contained only a single VersionedCardFolder, holding the current and previous state of the CardFolder. To support multiple folders, ModelManager now holds an ObservableList of CardFolders. The change is illustrated in the figure below, with the original implementation on the left and new implementation on the right.
To allow users to operate on multiple CardFolders, the following notable methods were also introduced:
-
ModelManager#addFolder(CardFolder cardfolder)- Adds a specified cardfolder to theModelManager’s list -
ModelManager#deleteFolder(int index)- Deletes theCardFolderat the specified index in theModelManager’slist -
ModelManager#getActiveCardFolderIndex()- Gets the index of the current activeCardFolder -
ModelManager#enterFolder(int index)- Specifies the activeCardFolderfor operations to be performed on via the index inModelManager’s list and sets the booleaninFoldertotrueto denote that user is inside a folder. -
ModelManager#exitFolderToHome()- Sets the booleaninFoldertofalseto indicate that the user is at the home directory. -
ModelManager#renameFolder(int index, String newName)- Renames the folder at the specified index in theModelManager’slist to the new name. -
ModelManager#getState()- Returns the current state of theModelManager. The possible states are {IN_FOLDER,IN_HOMEDIR,IN_TEST,IN_REPORT}.
Storage
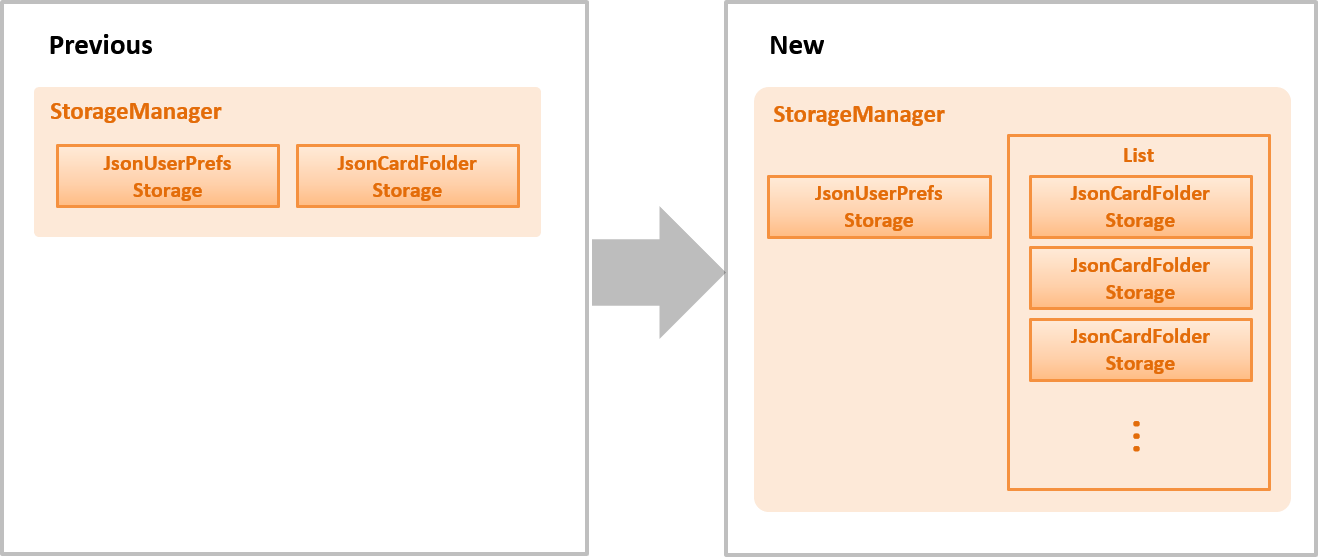
Similarly, the StorageManager needs to represent each CardFolder separately. In the same manner as in the Model component, we introduce a list of JsonCardFolderStorages. The change is illustrated in the figure below, with the original implementation on the left and new implementation on the right.
Notable new methods:
-
StorageManager#readCardFolders()- Reads in allCardFoldersfrom allCardFolderStorageobjects in the list. -
StorageManager#saveCardFolders(List<ReadOnlyCardFolder> cardFolders)- Saves allCardFoldersprovided in the argument to the user’s data directory.
Logic
The existing implementation of the Logic component propagates changes in a Model’s CardFolder to the Storage component. With listeners, it is informed when a CardFolder is modified (e.g. a new card is added) so that it can invoke the appropriate Storage methods.
The same principle was applied to propagate changes regarding CardFolders themselves (and not their stored cards) to Storage: e.g. adding a new folder. Model is now an Observable, and changes to a Model’s CardFolders will inform the LogicManager, which in turn invokes StorageManager#saveCardFolders(List<ReadOnlyCardFolder> cardFolders).
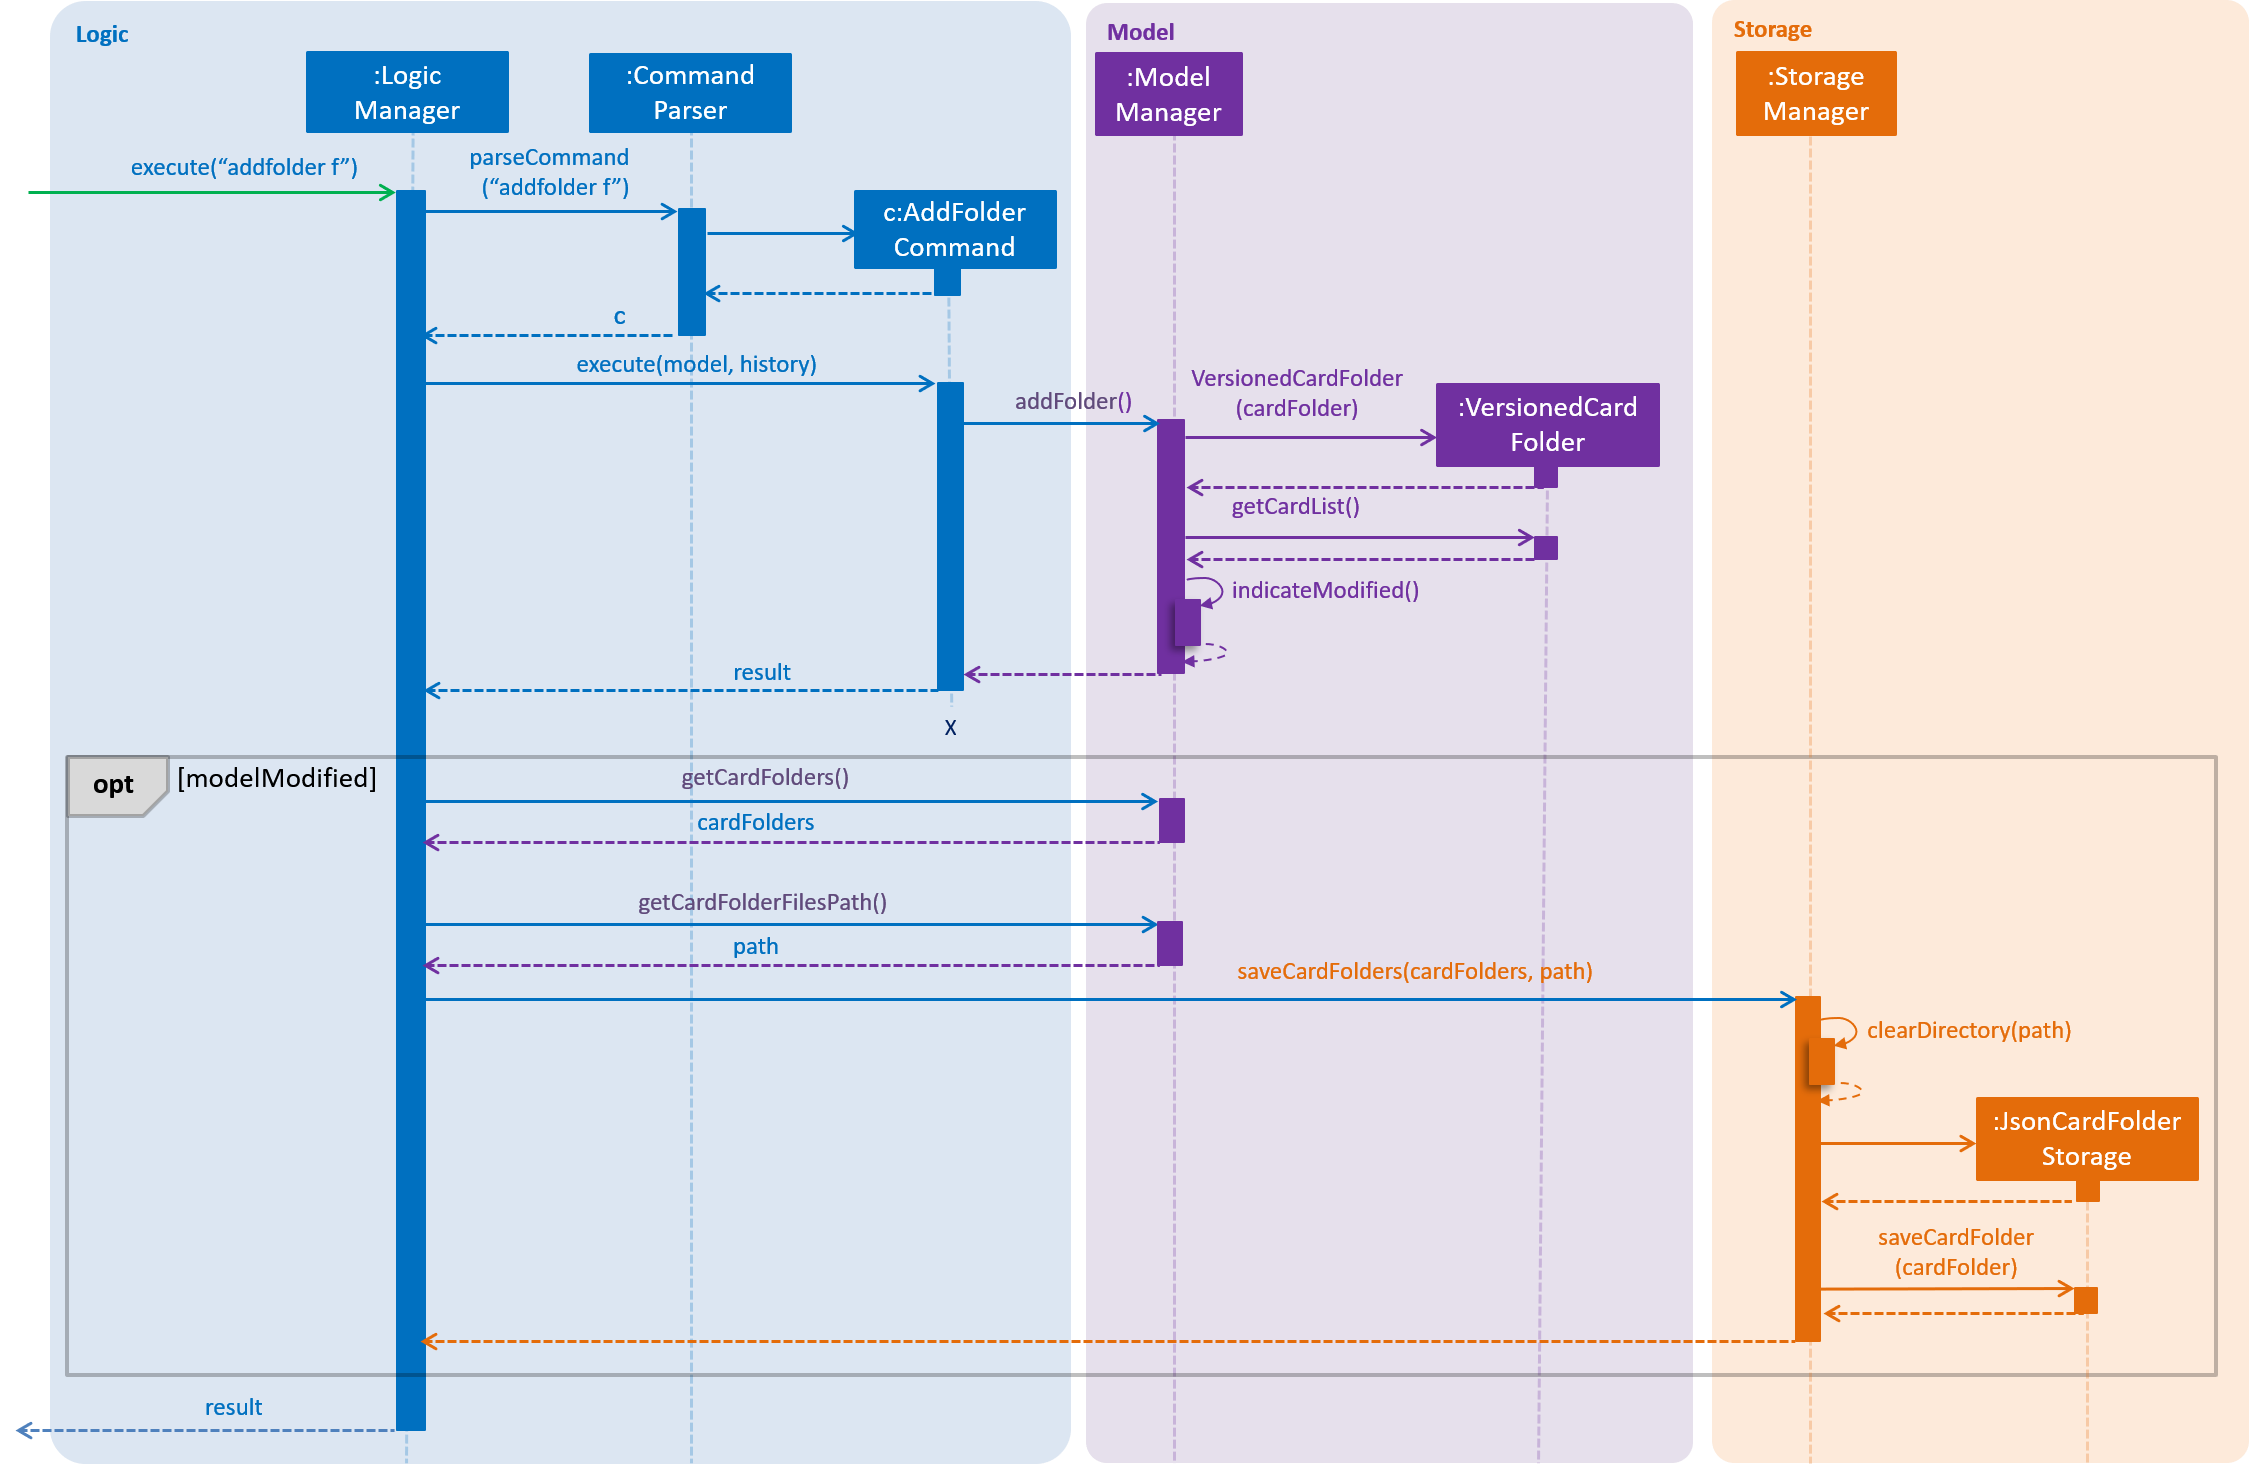
To illustrate how the Model, Storage and Logic components interact, below is a walkthrough of a typical usage scenario of the addfolder command. Figure 9, “Component interactions for an addfolder command” is a sequence diagram that summarises the example:
-
Step 1. The
addfoldercommand is executed. For example,addfolder f. -
Step 2. As with every command, the command parser reads the input and generates the relevant
Commandobject, in this case anAddFolderCommand. The object is returned to theLogicManager.
| If the input is invalid (e.g. user did not provide a folder name or provided one that violated the constraints of folder names), Step 2 would not proceed and an error message is displayed. The Model and Storage components would not be modified. |
-
Step 3. The
LogicManagerexecutes theAddFolderCommand, Before transferring control to the Model component with theModelManager#addFolder()method, a few checks are performed to ensure that the user is inside a folder and the model does not already have a folder with the same name (not shown in sequence diagram).
| If any of the aforementioned checks do not succeed, Step 3 would end in a Command Exception being thrown and would not proceed. Model and Storage components would not be modified. |
-
Step 4. The
ModelManagercreates aVersionedCardFolderto represent the newly created folder, storing a reference to its currently empty list of cards. Before returning control to the Logic component,ModelManager#indicateModified()is invoked to notify listeners in theLogicManagerthat the list ofCardFoldershave changed. -
Step 5. The Logic component takes over control and checks if the
ModelManageris modified. In the case ofaddfolderthe object is indeed modified (as a result of Step 4) and thus the component proceeds to save the Model’sCardFoldersto Storage. -
Step 6. Before handing over control to Storage, the
LogicManagerobtains the information to save and the path to save to withModelManager#getCardFolders()andModelManager#getCardFoldersFilesPath()respectively. It then passes these objects as parameters when it callsStorageManager#saveCardFolders(). -
Step 7. The Storage component receives control, with the
StorageManagerclearing the directory of data files at the specified path and creatingJsonCardFolderStorageobjects with path names equivalent to the names of the folders it has received. It then proceeds to invokeJsonCardFolderStorage#saveCardFolder()on all theJsonCardFolderStorageto save all the folders before returning to theLogicManager.
| If the path provided by the Model Component is invalid, the Storage component throws an exception and an error message is displayed. The changes made to Model are not saved and the command does not execute successfully. |
-
Step 8. The
LogicManagerterminates and returns the result of the command to the calling method.
addfolder commandUI
As folders are a layer of abstraction over the cards, there is a need for the GUI to represent this abstraction for greater clarity and ease of use for the user. This is done by introducing the FolderListPanel class, which displays a list of all folders that the user has.
The fullScreenPlaceholder:StackPane object houses the content in the main window of our application. Depending on whether the user is in the home directory or within a folder, different UI objects are placed within fullScreenPlaceholder.
-
When the user is in the home directory,
fullScreenPlaceholderholds aFolderListPanelto display all the folders in a list inside the main window. -
When the user is within a folder,
fullScreenPlaceholderholds aCardMainScreenobject, which is composed of aCardListPanelandBrowserPanel. These represent the list of cards on the scrolling sidebar, as well as the card viewer on the right. The content within theCardMainScreendepends on the particular folder the user has navigated into, as different folders hold different cards.
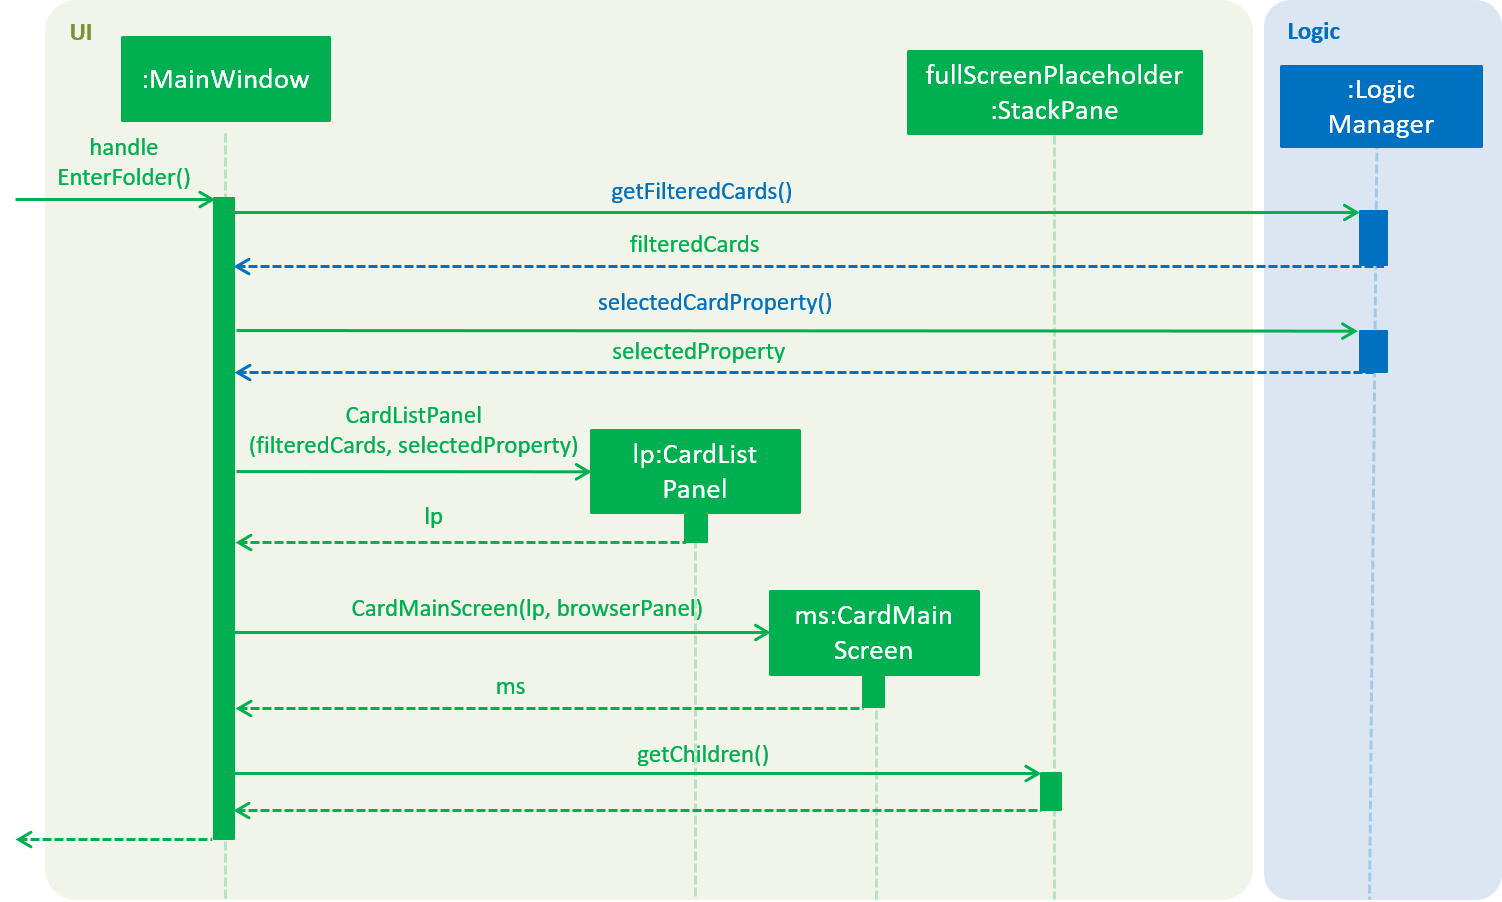
To better understand how the UI is updated, below is a walkthrough of what happens when the user enters a folder. Refer to the sequence diagram in Figure 10, “UI behaviour when user enters folder” for a visual representation:
-
Step 1. The Logic component informs the UI component that the user has entered a folder. The UI component responds by invoking
MainWindow#handleEnterFolder(). -
Step 2. UI retrieves the list of cards belonging to the entered folder from the
LogicManager. -
Step 3. A new
CardListPanelis created with the information obtained in Step 2. -
Step 4. The new
CardListPanelfrom Step 3, together with the existingBrowserPanel, are used to create a newCardMainScreenobject. -
Step 5. The content held by
fullScreenPlaceholderis replaced with the newly generatedCardMainScreen.
3.6.2. Design Considerations
Aspect: How multiple folders are represented in Model
-
Alternative 1 (current choice): List of structures representing individual folders
-
Pros: Scalable and better follows OOP principles.
-
Cons: Hard to implement, alters fundamental architecture of components.
-
-
Alternative 2: A single structure containing
Cardswith information on their folder membership (folder operations performed by iterating over all cards)-
Pros: Easy to implement.
-
Cons: Not scalable, will be computationally expensive to perform folder operations when there are many cards and/or folders.
-
Evaluation: On the account of how computationally expensive it would be to parse through thousands of cards every card or folder operation, the first alternative was chosen and time was set aside to overcome the technical challenge of implementing the choice.
Aspect: Folder identification
-
Alternative 1: Use a unique folder name
-
Pros: Easier to implement.
-
Cons: The undo/redo feature would not be compatible with this approach, as checking equality between different versions of a folder across time necessarily requires the comparison of cards.
-
-
Alternative 2: Identify a folder by its cards
-
Pros: There can be no folders with identical cards, preventing redundancy.
-
Cons: Two folders could have identical names as long as the cards are different, which is potentially confusing.
-
-
Alternative 3 (current choice): Mixed approach, use Alternative 1 for comparing different folders and Alternative 2 for comparing the same folder across time
-
Pros: Reaps the benefits of both approaches without the disadvantages.
-
Cons: Difficult to implement and for future developers to grasp the difference between the two types of comparisons.
-
Evaluation: While it was difficult the implement, Alternative 3 was chosen due to the immense limitations of the first two approaches. The third alternative had little to no downside apart from requiring time to understand and implement.
Aspect: Storage file name and folder name
-
Alternative 1: Let folder name be the file name of the storage file
-
Pros: Less ambiguity as to how file name is related to folder name, able to find storage file path with folder name.
-
Cons: Harder to retrieve folder name from the file as it requires parsing the path, more prone to data corruption as file name could be modified when application is running (although this could be overcome with some OS-level syscalls to lock the file).
-
-
Alternative 2 (current choice): Let file name be independent of folder name, which is stored inside the storage file itself
-
Pros: Easier to implement and avoids dependency on existing storage files after application starts.
-
Cons: When saving folders from Model, it is difficult to match folders with existing storage files. Hence, rather than saving the modified folder, it is more feasible to clear the directory and save all folders. This is computationally expensive and may not be scalable beyond a certain size.
-
Evaluation: While in the long-run, the first alternative appears to better decision, time limitations make Alternative 2 good enough for most practical use cases. The saved time was used to implement other features.
Aspect: What folders to generate in the event corrupted storage files are encountered
-
Alternative 1: Display a sample folder
-
Pros: Easy to implement, guaranteed that application will not be empty with no folders displayed.
-
Cons: Non-corrupted folders will not be displayed and will potentially be overwritten.
-
-
Alternative 2: Display non-corrupted folders
-
Pros: Non-corrupted data is preserved.
-
Cons: If all data is corrupted, an empty application is presented to the user.
-
-
Alternative 3 (current choice): Mixed approach, display all non-corrupted folders unless all data is corrupted, in which case display sample folder
-
Pros: Has the advantages but not the disadvantages of Alternatives 1 and 2.
-
Cons: More difficult to implement, developers will need to pay special attention to understand this behaviour.
-
Evaluation: Alternative 3 was deemed the most logical choice because it achieves the important objectives of retaining non-corrupted user data, while always ensuring there is data for the user to work with even if he/she is starting the application for the first time.
3.7. Navigating folders
3.7.1. Current Implementation
Navigation State
The state of the application with regard to navigation (i.e. whether a user is inside of a folder or at the home directory) affects the types of commands available to the user.
-
The commands that affect cards (e.g. adding a card, editing a card) are executed within folders and are known as Card Operations.
-
Commands that affect folders (e.g. adding a folder, deleting a folder) are only executable at the home directory and are known as Folder Operations.
Please refer to the User Guide for the full list of commands under both categories.
To keep track of navigation state, an enum State is maintained by the ModelManager. Other components may retrieve the current state with ModelManager#getState(). This is also how the Command objects determines whether the command is executable in the present navigation state.
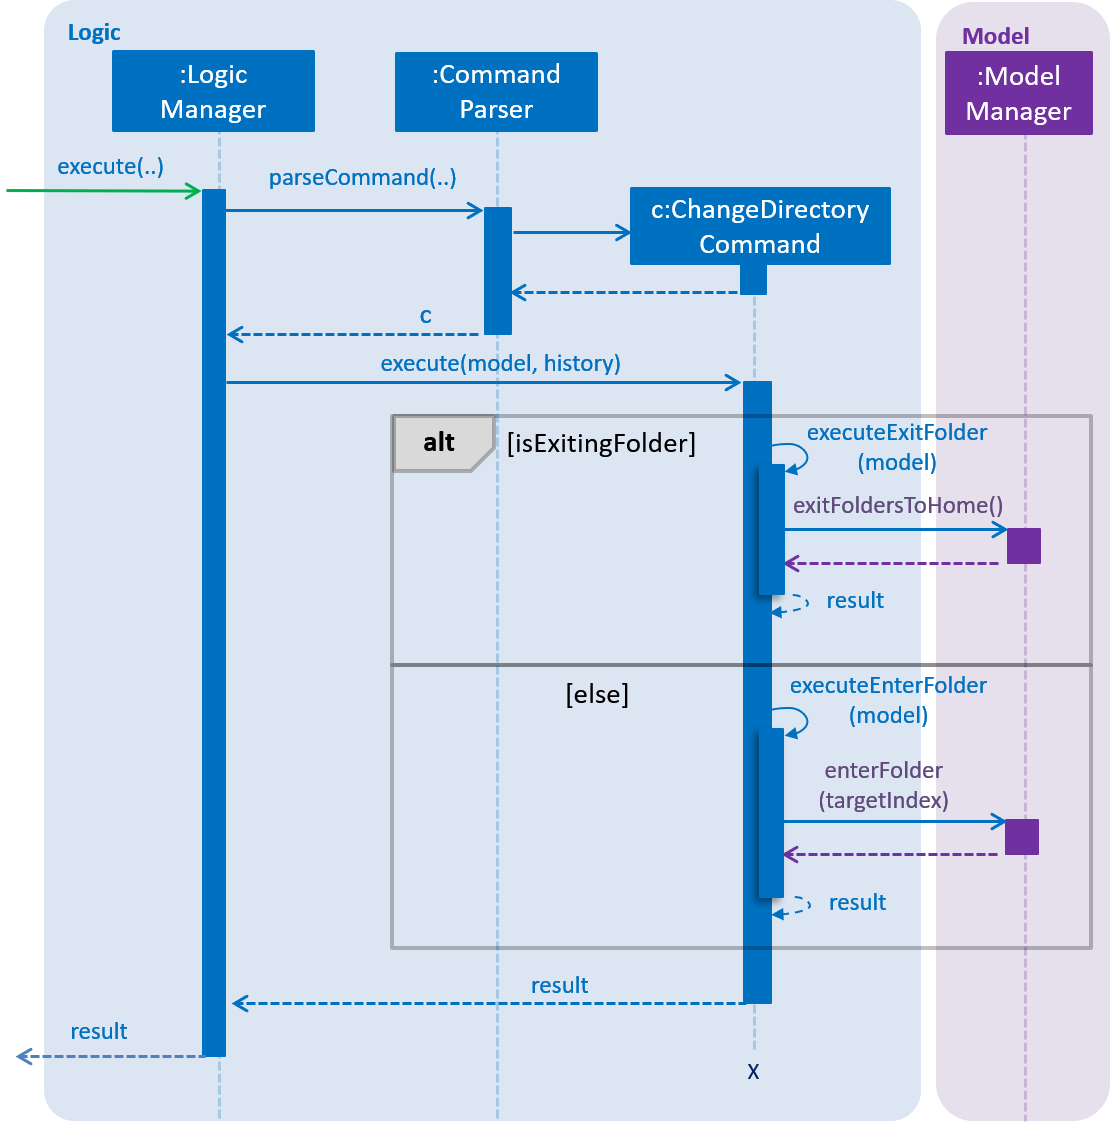
Change Directory Command
Folder navigation is achieved by the user through the use of the cd command. As navigating folders do not actually modify folders and their cards, folder navigation does not involve the Storage Component.
The change directory command has the following formats:
-
cd ..- Returns the user to the home directory. This command can only be executed when the user is inside a folder. -
cd FOLDER_INDEX- Enters the folder specified byFOLDER_INDEX. This command can only be executed from the home directory, when the user is not in any folder.
When a cd command is executed, the Logic component parses the command and creates a ChangeDirectoryCommand object. If the command is of the first format, ChangeDirectoryCommand() is invoked without any arguments and the boolean isExitingFolder is set to true. If the command is of the second format, the overloaded constructor ChangeDirectoryCommand(FOLDER_INDEX) is instead called and isExitingFolder is set to false.
ChangeDirectoryCommand#execute() is then invoked. The value of isExitingFolder will determine the corresponding methods in ModelManager that are called (exitFoldersToHome() or enterFolder()). The sequence diagram in Figure 11, “Component interactions for cd command” illustrates this conditional choice and the interactions involved with each option.
cd command3.7.2. Design Considerations
Aspect: Command format to enter and exit folders
-
Alternative 1 (current choice): Use variations of the same command (e.g.
cd ..andcd INDEX)-
Pros: More intuitive and akin to other Command Line applications.
-
Cons: Harder to implement as the logic for parsing the command is different from that of existing commands.
-
-
Alternative 2: Use distinct commands (e.g.
homeandenter INDEX)-
Pros: Commands would function similar to other commands in the application.
-
Cons: Harder for the user to get acquainted with as there are two separate commands with logically similar functionality; introduces redundancy.
-
Evaluation: This matter is highly subjective and conflicting feedback was received during testing. However, we believe that our target audience, a user familiar with the command line, would be more used to navigation with a single command and as such would prefer Alternative 1.
3.8. Test Session feature
3.8.1. Overall Current Implementation
This big feature mainly involves UI, Logic and Model components.
There are 3 main variables in ModelManager introduced to keep track of the current state of the user in a test
session.
-
currentTestedCardFolder-
The current card folder that the user is running a test session on (stored as an
ObservableListof cards) . -
Set to null if user is not inside a test session
-
-
currentTestedCard-
The current card the user is seeing in the test session, obtained from
currentTestedCardFolderusingcurrentTestedCardIndex. -
Set to null if user is not inside a test session
-
Related methods:
-
ModelManager#setCurrentTestedCard(Card card)- setcurrentTestedCardto the card specified. -
ModelManager#getCurrentTestedCard()- returns thecurrentTestedCard.
-
-
-
cardAlreadyAnswered-
A boolean variable to indicate if the user has already executed a valid answer command for the current card.
-
Related methods:
-
ModelManager#setCardAsAnswered()- setcardAlreadyAnsweredto true. -
ModelManager#setCardAsNotAnswered()- setcardAlreadyAnsweredto false. -
ModelManager#isCardAlreadyAnswered()- returns true if the current card has already been answered and false otherwise.
-
-
3.8.2. Overall Design Considerations
Aspect: Usage of an extra card variable to keep track of the current card in test session
-
Alternative 1 (current choice): Introduce another variable,
currentTestedCard, to store the card to display in the test session.-
Pros: More reader friendly. Save time from accessing the list to get card at that index.
-
Cons: Extra space used.
-
-
Alternative 2: No introduction of
currentTestedCardas using thecurrentTestedCardIndexsuffices. Every time a card is needed, can simply reference it usingcurrentTestedCardFolder#getIndex(currentTestedCardIndex).-
Pros: No need to store an extra variable so this method uses less space.
-
Cons: Not so reader friendly. Need to keep accessing the list using the index which can potentially lead to possible violation of the Law of Demeter where an object should only interact with objects that are closely related to it.
-
Evaluation:
We went with Alternative 1 since not a large amount of memory is taken up with just 1 extra card stored. As there will
be several references to the currentTestedCard, it will be better to store them somewhere. Abiding by the Law
of Demeter, currentTestedCard object will not be interacting with currentTestedCardFolder, limiting its
knowledge of that object which is encouraged according to the Principle of Least Knowledge.
3.8.3. Test / End Command
Current Implementation
Model
The main logic for test and end command is carried out in ModelManager with the following methods:
-
ModelManager#startTestSession()- begins a test session on the current card folder user is in and implicitly sorts the cards in it. -
ModelManager#endTestSession()- ends the current test session.
UI
To update the change in the UI to reflect that the user is a test session (app goes to full screen with question of the current card presented), the following methods are introduced.
-
MainWindow#handleStartTestSession(Card card)- creates a newTestSessionpage with the card specified and bring the page forward in front of the currentCardMainScreenpage. -
MainWindow#handleEndTestSession()- deletes the currentTestSessionpage and theCardMainScreenpage at the back is now presented to the user.
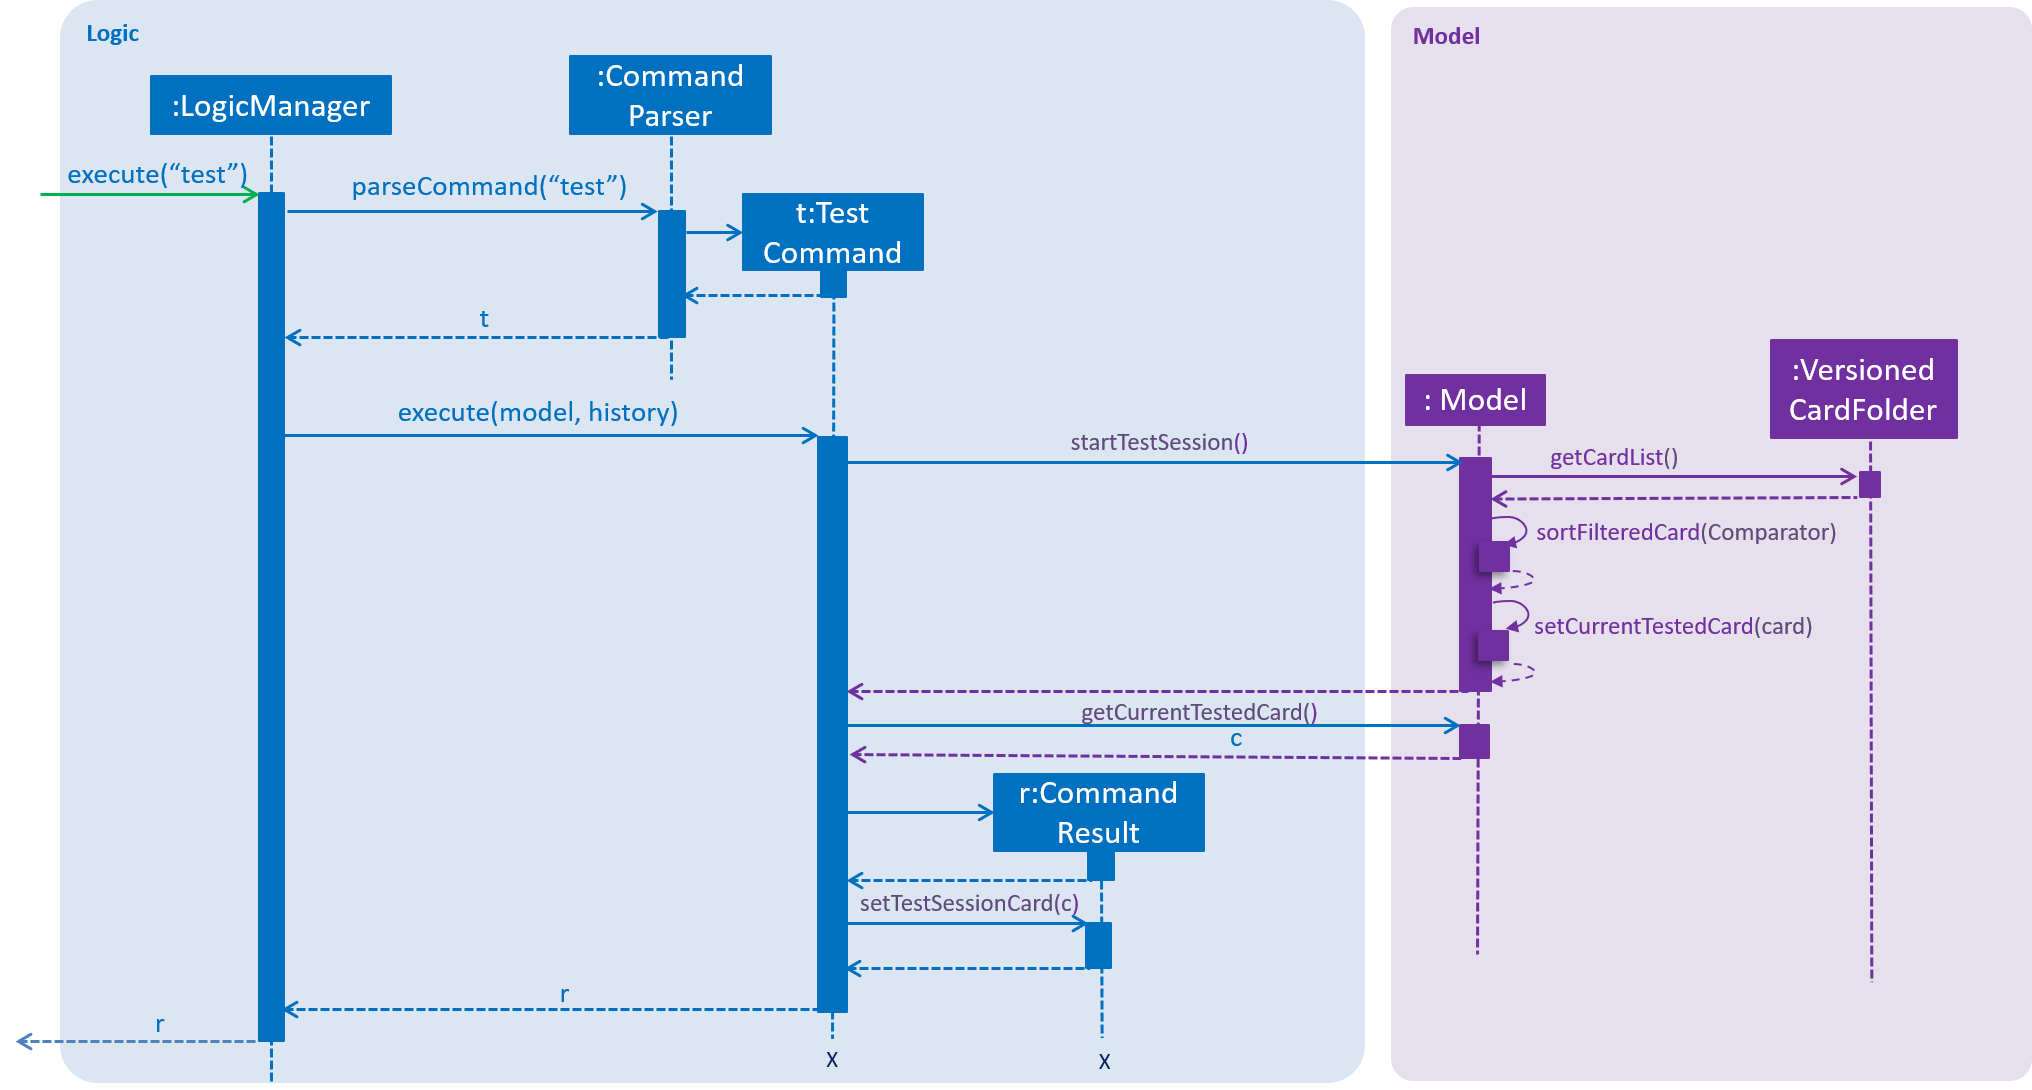
Example Usage of test command
To illustrate how the UI, Model and Logic components interact, below is a walkthrough of a typical usage scenario of
the test command.
Figure 12, “Component interactions for a test command” is a sequence diagram that summarises Model and Logic interactions, namely steps 1 to 7.
Step 1. User is inside a folder and wants to begin a test session on the current folder by executing the command
test.
Step 2. As with every command, the command parser reads the input and generates the relevant Command object, in
this case a TestCommand. The object is returned to the LogicManager.
Step 3. The LogicManager executes the TestCommand, storing the result and then transferring control to the
Model component, with Model#getState() to check that user is inside a folder and is not already in a test session.
(This is omitted from Figure 12, “Component interactions for a test command” for simplicity.)
| If the user is not inside a folder, this test command would be rendered invalid. Step 4 would not proceed and an error message is displayed. |
Step 4. After checking user is in a folder, ModelManager#startTestSession() method is invoked, which
does the following:
-
currentTestedCardFolderis set to the current folder the user is in, by invokinggetCardList()from the activeVersionedCardFolderinfolders.If this folder is empty such that there is no card to present to the user, an EmptyCardFolderExceptionis thrown, to be caught inTestCommand, which then throws aCommandExceptionto display an error message. -
The cards in this folder are sorted in ascending scores by invoking
sortFilteredCard(comparator), so that lowest score cards will be presented first to the user in a test session. -
ModelManager#setCurrentTestedCard(currentTestedCardIndex)is then invoked to setcurrentTestedCardto the first card in the folder ascurrentTestedCardIndexis set to 0. -
stateinModelis set toIN_TESTto specify that user is in a test session from now onwards. -
No change to
cardAlreadyAnsweredas it is by default false.
Step 5. For TestCommand to obtain the first card to present in the test session,
ModelManager#getCurrentTestedCard() is invoked and the Card, c, is returned.
Step 6. With control now transferred back to the logic unit, TestCommand creates a CommandResult object, r with the type START_TEST_SESSION, and
set testSessionCard in CommandResult to c obtained in Step 5.
Step 7. r is returned to LogicManager which then terminates and returns r to the caller method.
Step 8. The caller method here is in MainWindow. Control is now transferred to the UI component.
Step 9. MainWindow sees that CommandResult object r has the type START_TEST_SESSION. It invokes
MainWindow#handleStartTestSession(currentTestedCard) to display the currentTestedCard question and hints to the
user.
Example Usage of end command
Step 1. User is currently in a test session and executes the command end.
Step 2. An EndCommand object is created and LogicManager executes the EndCommand, storing the result and then
transferring control to the Model component, with Model#getState() to check that user is indeed in a test session.
| If the user is not in a test session, Step 3 would not proceed. |
Step 3. ModelManager#endTestSession() method is invoked, which does the following:
-
currentTestedCardFolderis set to null. -
ModelManager#setCurrentTestedCard(null)is invoked to setcurrentTestedCardto null. -
stateinModelis set toIN_FOLDERto specify that user is back in the folder. -
ModelManager#setCardAsNotAnswered()is invoked.
Step 4. As control is now transferred back to the logic unit, EndCommand creates a CommandResult object, r with
the type END_TEST_SESSION.
Step 5. r is returned to LogicManager which then terminates and returns r to the caller in MainWindow. Control is now transferred to the UI component.
Step 6. MainWindow sees that CommandResult object r has the type END_TEST_SESSION. It invokes
MainWindow#handleEndTestSession() to delete the current testSession page, presenting cardMainScreen page at the
back (the screen the user was seeing before entering the test session) to the user.
Design Considerations
Aspect: Way to execute a test/end command
-
Alternative 1 (current choice):
testis executed when inside a folder. The user does not have to specify the folder index andtestwould just immediately display the first card in this current folder.-
Pros: The most logical way of carrying out a test session is when the user is in the folder that he or she wants to be tested on. Lesser dependency on entering and exiting folder methods.
-
Cons: Requires the extra step of entering the folder before it can test the folder. User may actually see the questions before the test session.
-
-
Alternative 2:
testis executed when outside a folder, in the home directory. Test command would require a folder index, e.gtest 1to test the first folder. Implementation of getting the card from the folder would rely on enter folder command as well.-
Pros: Fast way to enter test session from home directory
-
Cons: Not logical for
testto be called from inside the home directory which should only allow folder operations.testwill then have to implicitly enter the folder to gain access to the cards in it in order to display them, creating a dependency between the test and enter folder commands. Similar issue will arise for the end test session command where user will need to implicitly exit the folder.
-
Evaluation: Overall, Alternative 1 is a better choice following the Single Level of Abstraction Principle(SLAP) where a function should not mix different levels of abstractions. We can then better achieve higher cohesion and lower coupling. Also, user being able to see the questions before the test session is not a big issue since the answer will not be shown unless user selects the card.
3.8.4. Answer Command
Current Implementation
Model
To facilitate the marking of attempted answer, we introduce the following method in ModelManager.
-
ModelManager#markAttemptedAnswer(Answer attemptedAnswer)- returns true if attemptedAnswer is correct and false if attemptedAnswer is wrong. It compares the attempted answer and the correct answer obtained from the current card.
| Comparison is not case-sensitive |
Logic
To facilitate the update of score after marking the card, we introduce the following method in ModelManager.
-
ModelManager#createScoredCard(Card cardToMark, boolean markCorrect)- creates a new card with the updated score.
UI
To update the change in the UI to show the user the result of the marked answer, whether it is correct or wrong, the following methods are introduced.
-
MainWindow#handleCorrectAnswer()- updates currentTestSessionpage to green colour background with correct answer and correct answer description. -
MainWindow#handleWrongAnswer()- updates currentTestSessionpage to red colour background with correct answer and wrong answer description.
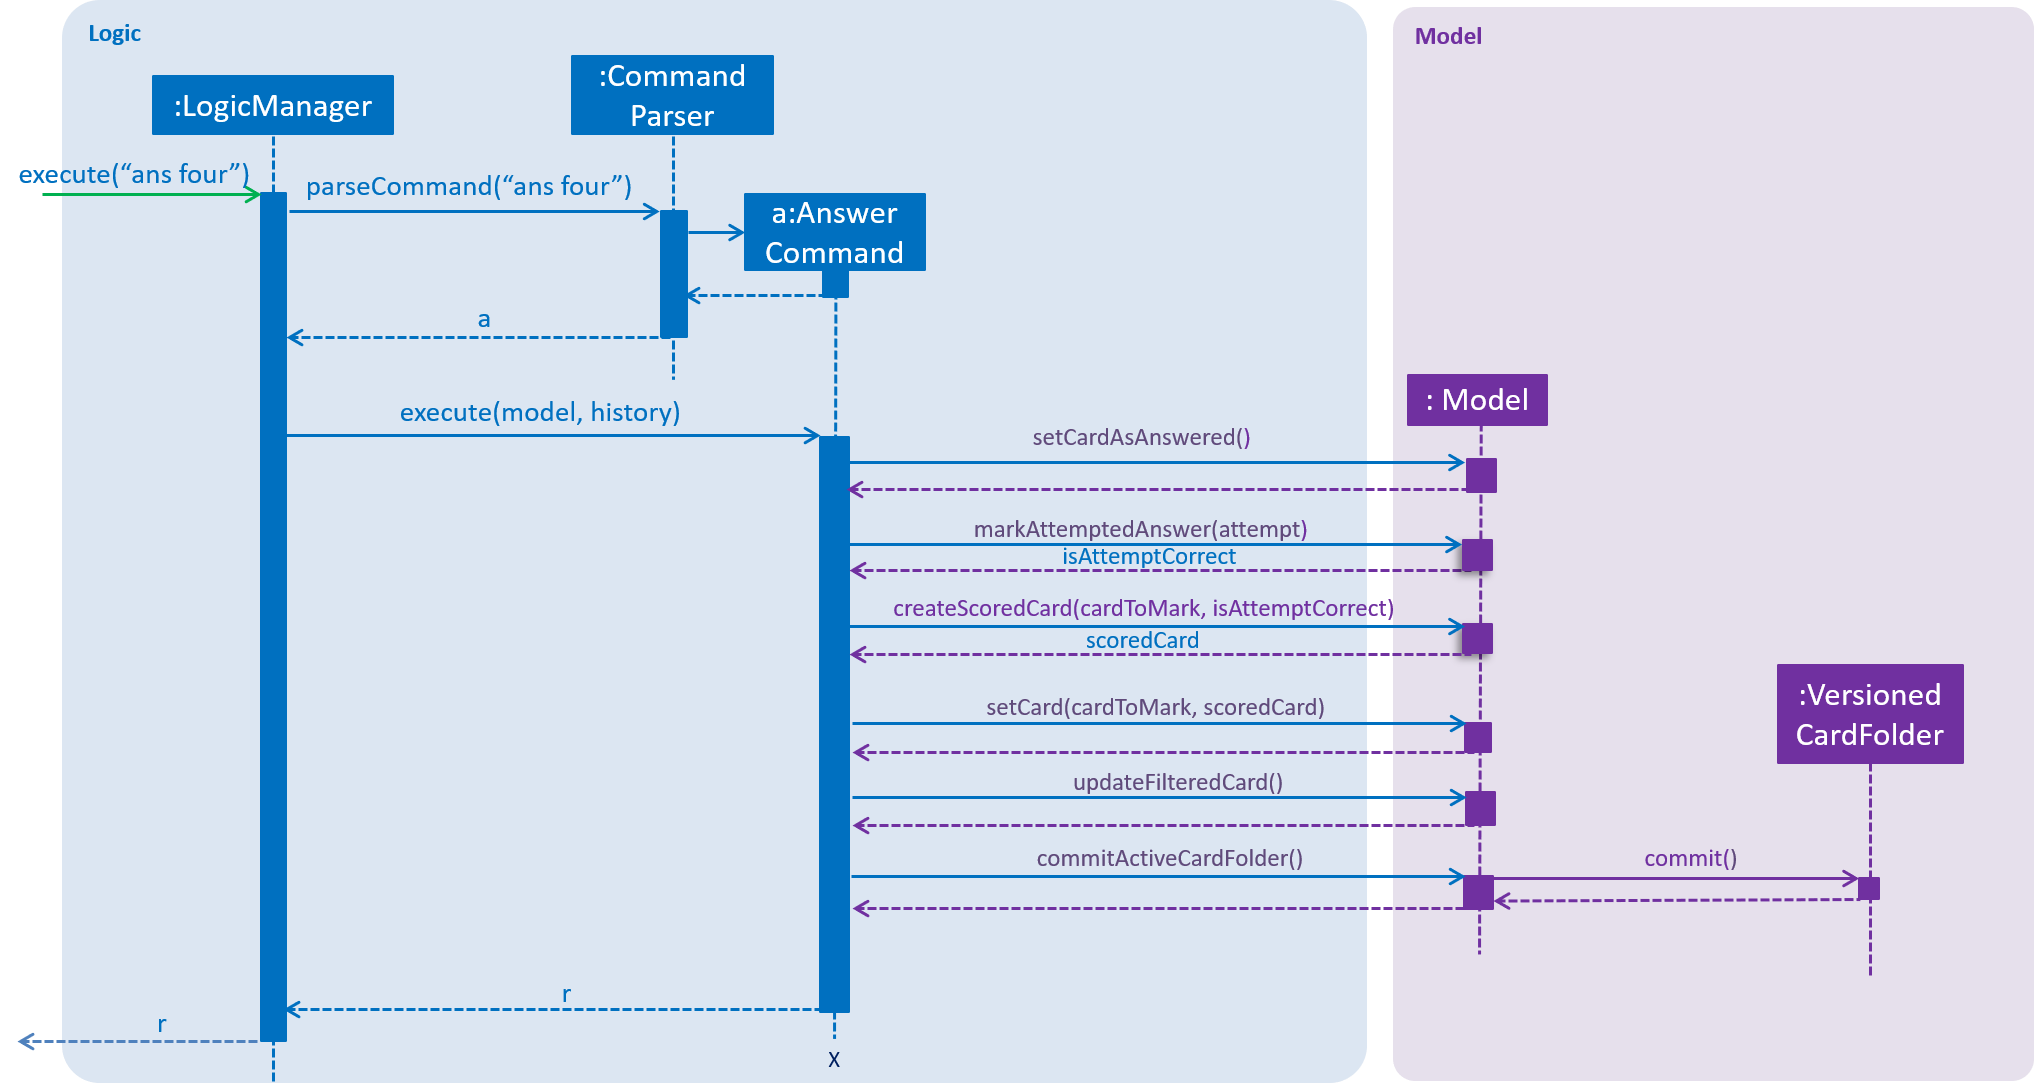
Example Usage of answer command
To illustrate how the components interact, below is a walkthrough of a typical usage scenario of the answer command.
Figure 13, “Component interactions for a answer command” is a sequence diagram that summarises Model and Logic interactions, namely steps 1
to 8.
Step 1. User is in a test session and wants to answer the question on the card currently presented by executing
ans four.
Step 2. An AnswerCommand object is created and LogicManager executes the AnswerCommand, storing the result and
then transferring control to the Model component, with Model#getState() and
ModelManager#isCardAlreadyAnswered() to check that user is indeed in a test session and has not attempted an answer
already. (This is omitted from Figure 13, “Component interactions for a answer command” for simplicity.)
If the user is not in a test session or already attempted an answer for the current card, this ans command would be
rendered invalid. Step 3 would not proceed and an error message is displayed.
|
Step 3. After both checks have passed, ModelManager#setCardAsAnswered() is invoked.
Step 4. ModelManager now marks the attempted answer by invoking ModelManager#markAttemptedAnswer(attemptedAnswer).
Step 5. Given the result of the attempt, a new card exactly the same as the current
card but with the updated score is created and replaces the current one by invoking ModelManager#createScoredCard(Card
cardToMark, boolean markCorrect) followed by Model#setCard(cardToMark, scoredCard).
Step 6. To complete the update in the change in score, Model#updateFilteredCard(PREDICATE_SHOW_ALL_CARDS) and
Model#commitActiveCardFolder() are invoked.
Step 7. AnswerCommand now creates a CommandResult object, r with either type ANSWER_CORRECT or ANSWER_WRONG
depending on the outcome of the attempt.
Step 8. r is returned to LogicManager which then terminates and returns r to the caller.
Step 9. The caller method is in MainWindow. Control is now transferred to the UI component.
Step 10. If MainWindow sees that CommandResult object r has the type ANSWER_CORRECT, it invokes
MainWindow#handleCorrectAnswer() to display the correct attempt TestSession page to the user.
If MainWindow sees that CommandResult object r has the type ANSWER_WRONG, it invokes
MainWindow#handleWrongAnswer() to display the wrong attempt TestSession page to the user.
3.8.5. Next Command
Current Implementation
Model
The following method is introduced in ModelManager to display to the user the next card in the test session.
ModelManager#testNextCard() - returns true if it successfully finds a next card to present in the test session and
false otherwise (if there is no more cards left to test in the folder).
UI
To display the next card in the test session, the method below is introduced in MainWindow.
-
MainWindow#handleNextCardTestSession(Card card)- deletes the currentTestSessionpage and adds a newTestSessionpage with this next card specified.
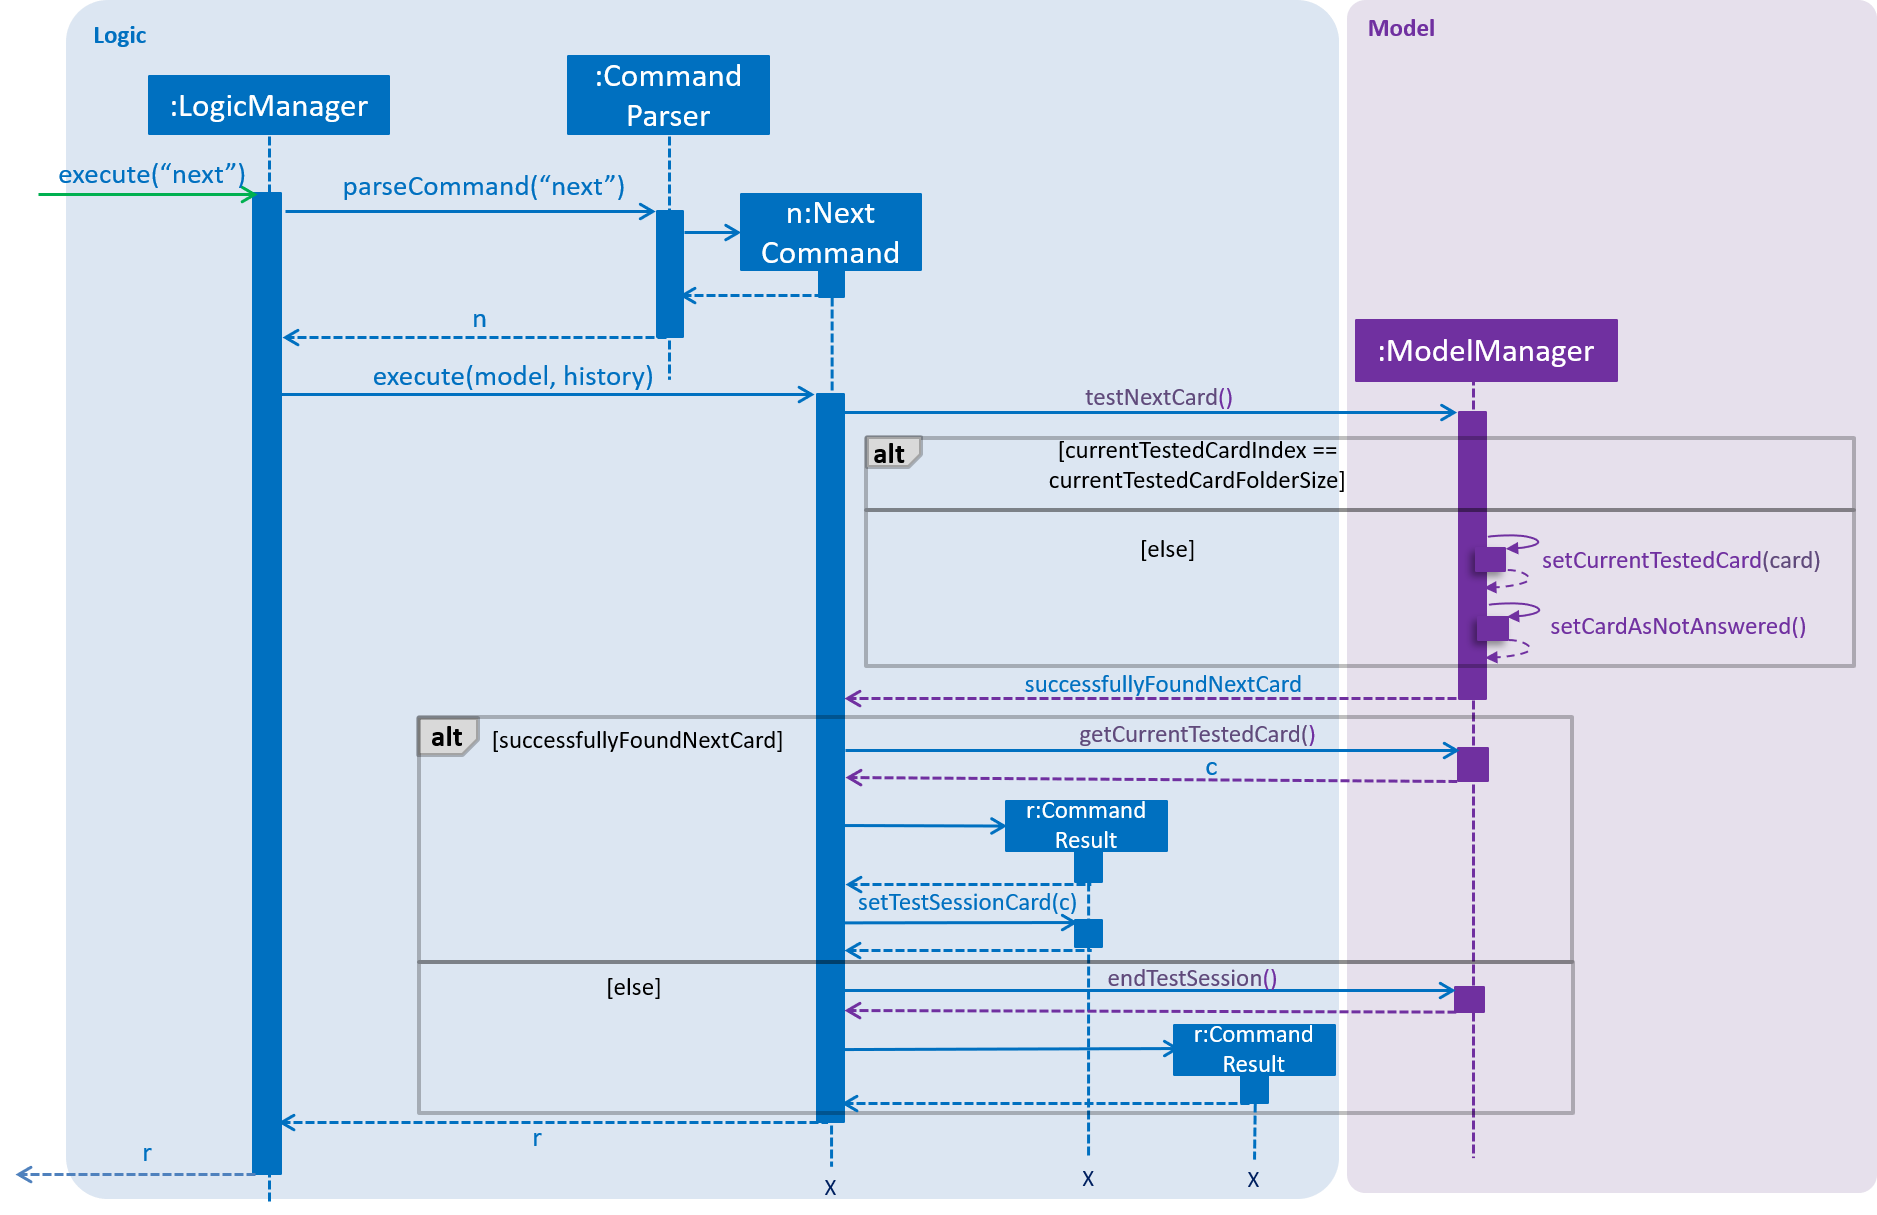
Example Usage of next command
To illustrate how the UI, Model and Logic components interact, below is a walkthrough of a typical usage scenario of
the next command.
Figure 14, “Component interactions for a next command” is a sequence diagram that summarises Model and Logic interactions, namely steps 1
to 6.
Step 1. User is in a test session and wants to move on to the next card by executing a next.
Step 2. A NextCommand object is created and LogicManager executes the NextCommand, storing the result and
then transferring control to the Model component, with Model#getState() and
ModelManager#isCardAlreadyAnswered() to check that user is indeed in a test session and has attempted an
answer already. (This is omitted from Figure 14, “Component interactions for a next command” for simplicity.)
If the user is not in a test session or has not attempted an answer for the current card, this next command would be
rendered invalid. Step 3 would not proceed and an error message is displayed.
|
Step 3. After both checks have passed, ModelManager#testNextCard() method is invoked, which does the following:
-
currentTestedCardIndexincremented by 1. -
currentTestedCardIndexis then checked if it equals to the size ofcurrentTestedCardFolder.-
Case 1: This check returns true.
This meanscurrentTestedCardIndexis invalid and there is no more next card to be presented to the user. This method immediately returns false. -
Case 2: This check returns true.
This meanscurrentTestedCardIndexis valid and will be used to get the next card fromcurrentTestedCardFolder. This card is set as thecurrentTestedCardvia theModelManager#setCurrentTestedCard (cardToTest).ModelManager#setCardAsNotAnsweredis then invoked to reset the value ofcardAlreadyAnswered. This method returns true.
-
Step 4. From the result of ModelManager#testNextCard() method earlier:
-
Case 1: Method returns false.
Anextcommand will be equivalent to anendcommand.ModelManager#endTestSession()is invoked. Step 5 does not proceed. Instead, step 3 and onwards of the Example Usage of end command takes over. -
Case 2: Method returns true. For
NextCommandto obtain the next card to present in the test session,ModelManager#getCurrentTestedCard()is invoked and theCard,c, is returned.
Step 5. With control now transferred back to the logic unit, NextCommand creates a CommandResult object, r with
the type SHOW_NEXT_CARD, and set testSessionCard in CommandResult to c.
Step 6. r is returned to LogicManager which then terminates and returns r to the caller method.
Step 7. The caller method here is in MainWindow. Control is now transferred to the UI component.
Step 8. MainWindow sees that CommandResult object r has the type SHOW_NEXT_CARD. It invokes
MainWindow#handleNextCardTestSession(currentTestedCard) to display this new currentTestedCard question and hints
to the user.
next commandDesign Considerations
Aspect: Behavior of next command executed on the last card
-
Alternative 1 (current choice): A
nextcommand will be equivalent to anendcommand-
Pros: More convenient and user-friendly. It is common sense to end the test session for the user.
-
Cons: By right, it is not correct since next command is just to show the next card.
-
-
Alternative 2: A
nextcommand will throw an exception-
Pros: Most correct way to do it since there is no next card to display.
-
Cons: User may not understand. It is not user-friendly as user has to keep track of which card it is at to prevent the exception thrown.
-
Evaluation: With our target audience in mind, Alternative 1 is the more user friendly and intuitive way to handle this scenario.
3.9. Undo/Redo feature
The following section details a feature implemented in the earlier iteration of the application. As such, the diagrams still refer to AddressBook, which has since replaced with CardFolder. The outdated diagrams here will be updated by v2.0.
|
3.9.1. Current Implementation
The undo/redo mechanism is facilitated by VersionedCardFolder.
It extends CardFolder with an undo/redo history, stored internally as an cardFolderStateList and currentStatePointer.
Additionally, it implements the following operations:
-
VersionedCardFolder#commit()— Saves the current card folder state in its history. -
VersionedCardFolder#undo()— Restores the previous card folder state from its history. -
VersionedCardFolder#redo()— Restores a previously undone card folder state from its history.
These operations are exposed in the Model interface as Model#commitCardFolder(), Model#undoCardFolder() and Model#redoCardFolder() respectively.
Given below is an example usage scenario and how the undo/redo mechanism behaves at each step.
Step 1. The user launches the application for the first time. The VersionedCardFolder will be initialized with the initial card folder state, and the currentStatePointer pointing to that single card folder state.

Step 2. The user executes delete 5 command to delete the 5th card in the card folder. The delete command calls Model#commitCardFolder(), causing the modified state of the card folder after the delete 5 command executes to be saved in the cardFolderStateList, and the currentStatePointer is shifted to the newly inserted card folder state.

Step 3. The user executes add q/Some question … to add a new card. The add command also calls Model#commitCardFolder(), causing another modified card folder state to be saved into the cardFolderStateList.

If a command fails its execution, it will not call Model#commitCardFolder(), so the card folder state will not be saved into the cardFolderStateList.
|
Step 4. The user now decides that adding the card was a mistake, and decides to undo that action by executing the undo command. The undo command will call Model#undoCardFolder(), which will shift the currentStatePointer once to the left, pointing it to the previous card folder state, and restores the card folder to that state.
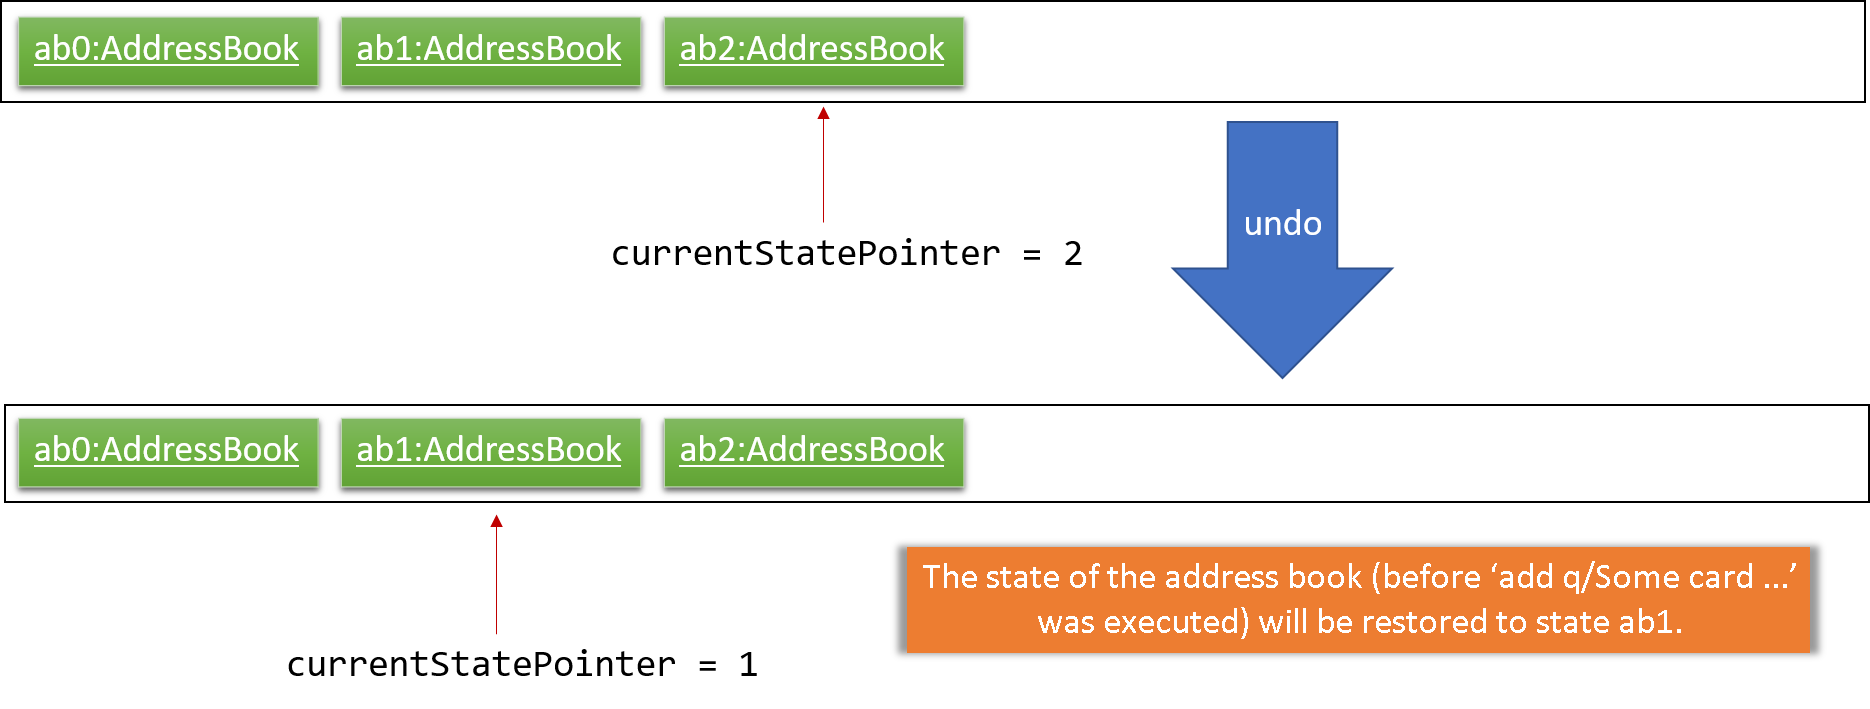
If the currentStatePointer is at index 0, pointing to the initial card folder state, then there are no previous card folder states to restore. The undo command uses Model#canUndoCardFolder() to check if this is the case. If so, it will return an error to the user rather than attempting to perform the undo.
|
The following sequence diagram shows how the undo operation works:
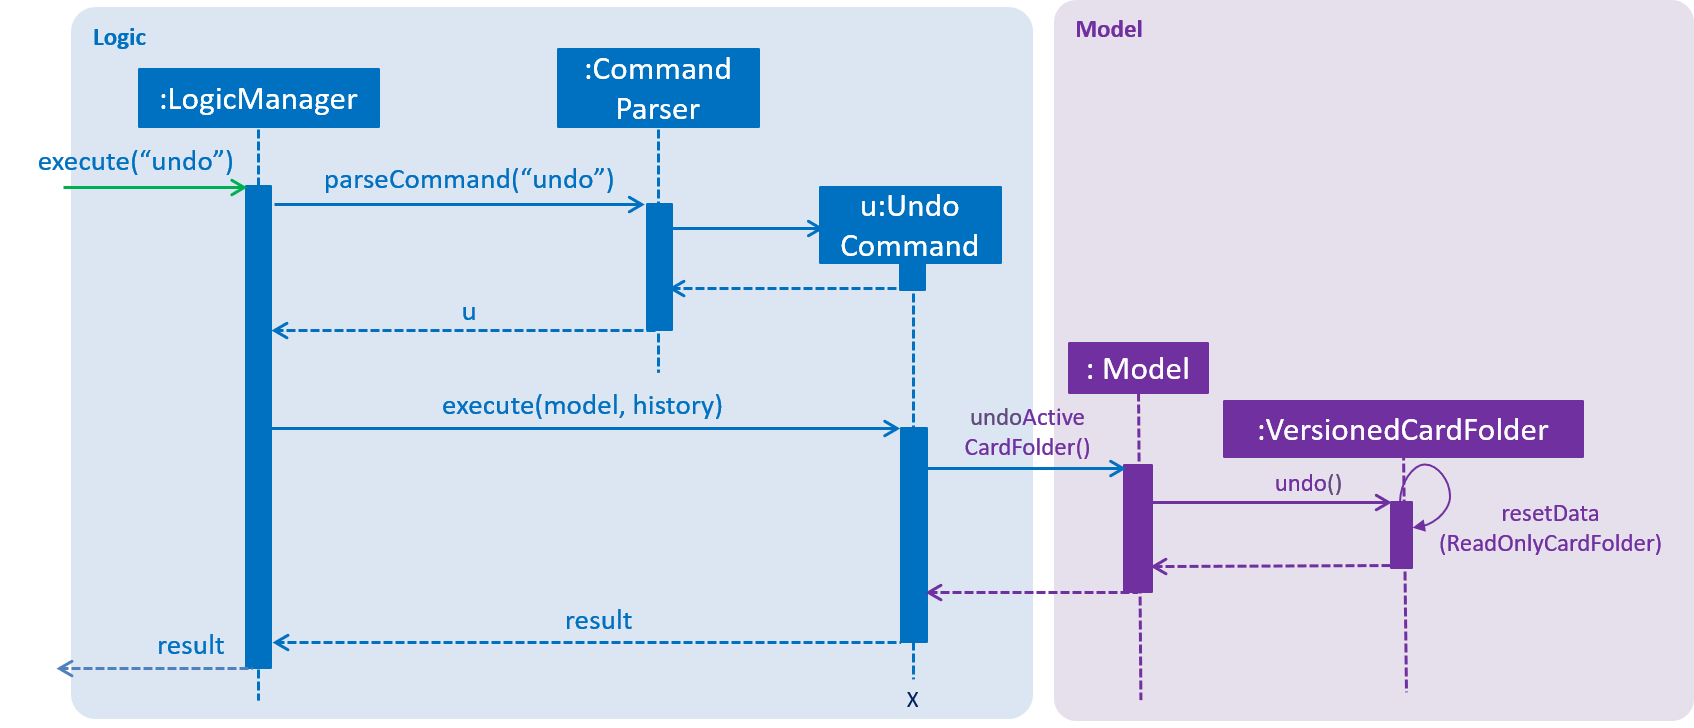
The redo command does the opposite — it calls Model#redoCardFolder(), which shifts the currentStatePointer once to the right, pointing to the previously undone state, and restores the card folder to that state.
If the currentStatePointer is at index cardFolderStateList.size() - 1, pointing to the latest card folder state, then there are no undone card folder states to restore. The redo command uses Model#canRedoCardFolder() to check if this is the case. If so, it will return an error to the user rather than attempting to perform the redo.
|
Step 5. The user then decides to execute the command list. Commands that do not modify the card folder, such as list, will usually not call Model#commitCardFolder(), Model#undoCardFolder() or Model#redoCardFolder(). Thus, the cardFolderStateList remains unchanged.

Step 6. The user executes clear, which calls Model#commitCardFolder(). Since the currentStatePointer is not pointing at the end of the cardFolderStateList, all card folder states after the currentStatePointer will be purged. We designed it this way because it no longer makes sense to redo the add q/Some question … command. This is the behavior that most modern desktop applications follow.
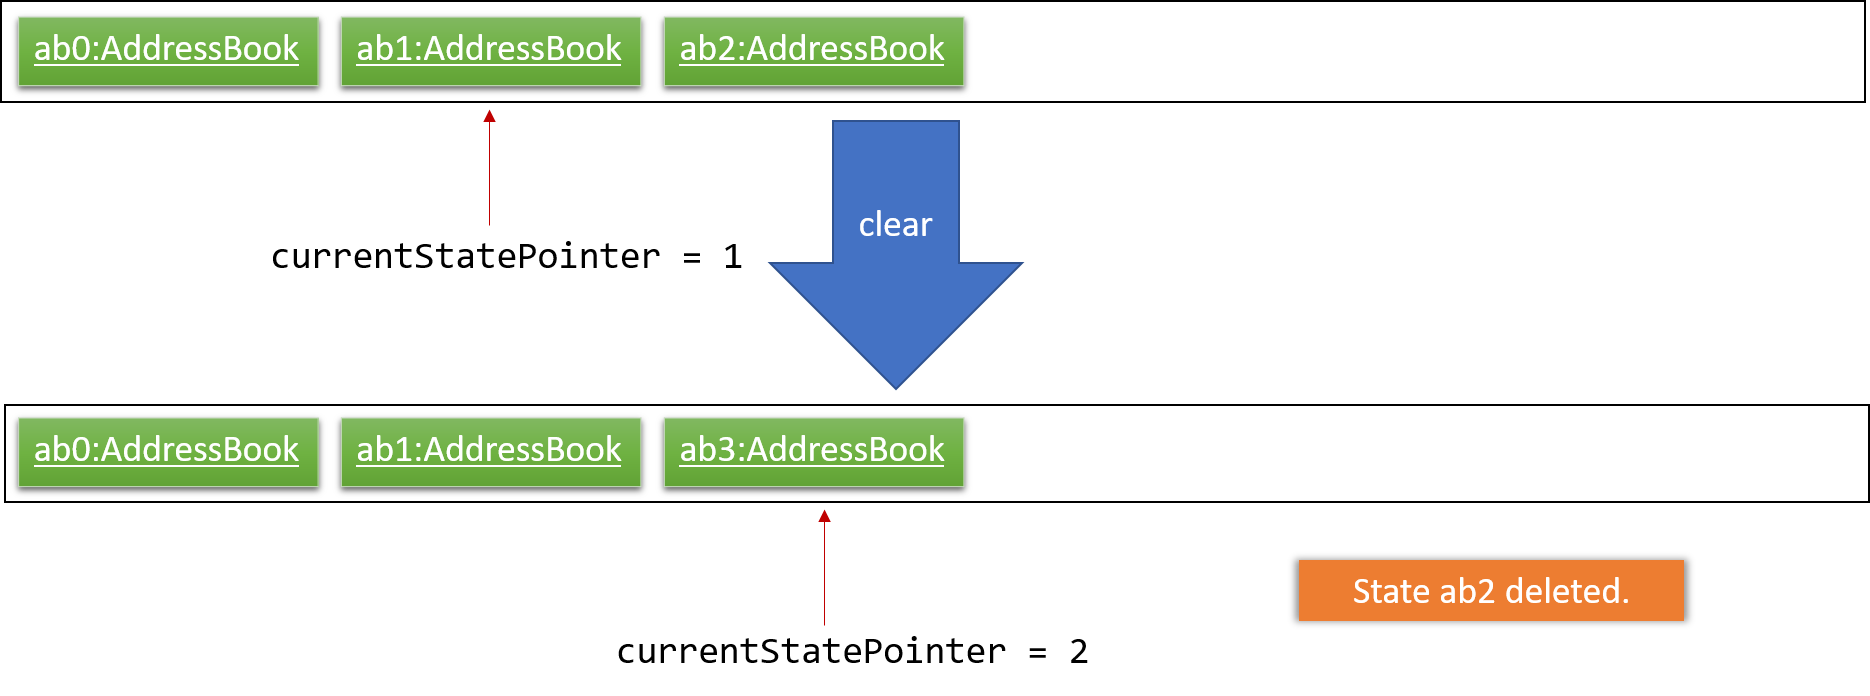
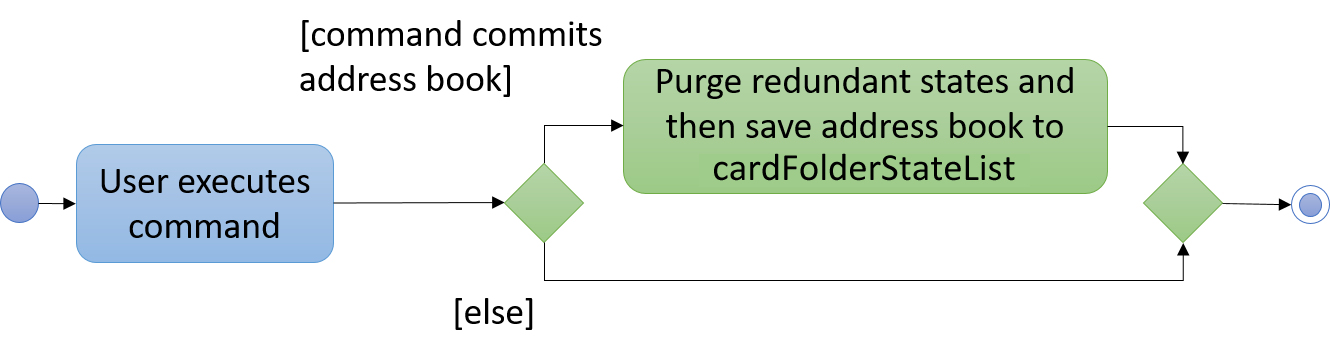
The following activity diagram summarizes what happens when a user executes a new command:
3.9.2. Design Considerations
Aspect: How undo & redo executes
-
Alternative 1 (current choice): Saves the entire card folder.
-
Pros: Easy to implement.
-
Cons: May have performance issues in terms of memory usage.
-
-
Alternative 2: Individual command knows how to undo/redo by itself.
-
Pros: Will use less memory (e.g. for
delete, just save the card being deleted). -
Cons: We must ensure that the implementation of each individual command are correct.
-
Aspect: Data structure to support the undo/redo commands
-
Alternative 1 (current choice): Use a list to store the history of card folder states.
-
Pros: Easy for new Computer Science student undergraduates to understand, who are likely to be the new incoming developers of our project.
-
Cons: Logic is duplicated twice. For example, when a new command is executed, we must remember to update both
HistoryManagerandVersionedCardFolder.
-
-
Alternative 2: Use
HistoryManagerfor undo/redo-
Pros: We do not need to maintain a separate list, and just reuse what is already in the codebase.
-
Cons: Requires dealing with commands that have already been undone: We must remember to skip these commands. Violates Single Responsibility Principle and Separation of Concerns as
HistoryManagernow needs to do two different things.
-
3.10. Logging
We are using java.util.logging package for logging. The LogsCenter class is used to manage the logging levels and logging destinations.
-
The logging level can be controlled using the
logLevelsetting in the configuration file (See Section 3.11, “Configuration”) -
The
Loggerfor a class can be obtained usingLogsCenter.getLogger(Class)which will log messages according to the specified logging level -
Currently log messages are output through:
Consoleand to a.logfile.
Logging Levels
-
SEVERE: Critical problem detected which may possibly cause the termination of the application -
WARNING: Can continue, but with caution -
INFO: Information showing the noteworthy actions by the App -
FINE: Details that is not usually noteworthy but may be useful in debugging e.g. print the actual list instead of just its size
3.11. Configuration
Certain properties of the application can be controlled (e.g user prefs file location, logging level) through the configuration file (default: config.json).
4. Documentation
We use asciidoc for writing documentation.
| We chose asciidoc over Markdown because asciidoc, although a bit more complex than Markdown, provides more flexibility in formatting. |
4.1. Editing Documentation
See UsingGradle.adoc to learn how to render .adoc files locally to preview the end result of your edits.
Alternatively, you can download the AsciiDoc plugin for IntelliJ, which allows you to preview the changes you have made to your .adoc files in real-time.
4.2. Publishing Documentation
See UsingTravis.adoc to learn how to deploy GitHub Pages using Travis.
4.3. Converting Documentation to PDF format
We use Google Chrome for converting documentation to PDF format, as Chrome’s PDF engine preserves hyperlinks used in webpages.
Here are the steps to convert the project documentation files to PDF format.
-
Follow the instructions in UsingGradle.adoc to convert the AsciiDoc files in the
docs/directory to HTML format. -
Go to your generated HTML files in the
build/docsfolder, right click on them and selectOpen with→Google Chrome. -
Within Chrome, click on the
Printoption in Chrome’s menu. -
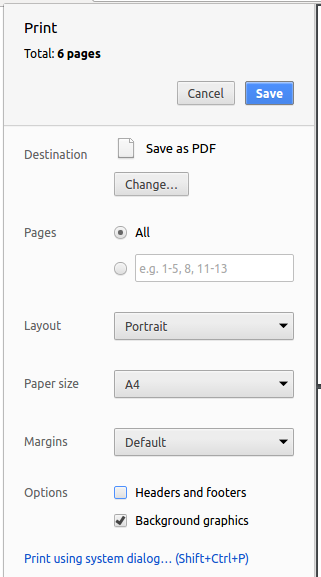
Set the destination to
Save as PDF, then clickSaveto save a copy of the file in PDF format. For best results, use the settings indicated in the screenshot below.
4.4. Site-wide Documentation Settings
The link: build.gradle file specifies some project-specific asciidoc attributes which affects how all documentation files within this project are rendered.
Attributes left unset in the build.gradle file will use their default value, if any.
|
| Attribute question | Description | Default value |
|---|---|---|
|
The question of the website. If set, the question will be displayed near the top of the page. |
not set |
|
URL to the site’s repository on GitHub. Setting this will add a "View on GitHub" link in the navigation bar. |
not set |
|
Define this attribute if the project is an official SE-EDU project. This will render the SE-EDU navigation bar at the top of the page, and add some SE-EDU-specific navigation items. |
not set |
4.5. Per-file Documentation Settings
Each .adoc file may also specify some file-specific asciidoc attributes which affects how the file is rendered.
Asciidoctor’s built-in attributes may be specified and used as well.
Attributes left unset in .adoc files will use their default value, if any.
|
| Attribute question | Description | Default value |
|---|---|---|
|
Site section that the document belongs to.
This will cause the associated item in the navigation bar to be highlighted.
One of: * Official SE-EDU projects only |
not set |
|
Set this attribute to remove the site navigation bar. |
not set |
4.6. Site Template
The files in link: docs/stylesheets are
the CSS stylesheets of the site.
You can modify them to change some properties of the site’s design.
The files in link: docs/templates controls the rendering of .adoc files into HTML5.
These template files are written in a mixture of Ruby and Slim.
|
Modifying the template files in link: |
5. Testing
5.1. Running Tests
There are three ways to run tests.
| The most reliable way to run tests is the 3rd one. The first two methods might fail some GUI tests due to platform/resolution-specific idiosyncrasies. |
Method 1: Using IntelliJ JUnit test runner
-
To run all tests, right-click on the
src/test/javafolder and chooseRun 'All Tests' -
To run a subset of tests, you can right-click on a test package, test class, or a test and choose
Run 'ABC'
Method 2: Using Gradle
-
Open a console and run the command
gradlew clean allTests(Mac/Linux:./gradlew clean allTests)
| See UsingGradle.adoc for more info on how to run tests using Gradle. |
Method 3: Using Gradle (headless)
Thanks to the TestFX library we use, our GUI tests can be run in the headless mode. In the headless mode, GUI tests do not show up on the screen. That means the developer can do other things on the Computer while the tests are running.
To run tests in headless mode, open a console and run the command gradlew clean headless allTests (Mac/Linux: ./gradlew clean headless allTests)
5.2. Types of tests
We have two types of tests:
-
GUI Tests - These are tests involving the GUI. They include,
-
System Tests that test the entire App by simulating user actions on the GUI. These are in the
systemtestspackage. -
Unit tests that test the individual components. These are in
seedu.knowitall.uipackage.
-
-
Non-GUI Tests - These are tests not involving the GUI. They include,
-
Unit tests targeting the lowest level methods/classes.
e.g.seedu.knowitall.commons.StringUtilTest -
Integration tests that are checking the integration of multiple code units (those code units are assumed to be working).
e.g.seedu.knowitall.storage.StorageManagerTest -
Hybrids of unit and integration tests. These test are checking multiple code units as well as how the are connected together.
e.g.seedu.knowitall.logic.LogicManagerTest
-
5.3. Troubleshooting Testing
Problem: HelpWindowTest fails with a NullPointerException.
-
Reason: One of its dependencies,
HelpWindow.htmlinsrc/main/resources/docsis missing. -
Solution: Execute Gradle task
processResources.
6. Dev Ops
6.1. Build Automation
See UsingGradle.adoc to learn how to use Gradle for build automation.
6.2. Continuous Integration
We use Travis CI and AppVeyor to perform Continuous Integration on our projects. See UsingTravis.adoc and UsingAppVeyor.adoc for more details.
6.3. Coverage Reporting
We use Coveralls to track the code coverage of our projects. See UsingCoveralls.adoc for more details.
6.4. Documentation Previews
When a pull request has changes to asciidoc files, you can use Netlify to see a preview of how the HTML version of those asciidoc files will look like when the pull request is merged. See UsingNetlify.adoc for more details.
6.5. Making a Release
Here are the steps to create a new release.
-
Update the version number in link:
MainApp.java. -
Generate a JAR file using Gradle.
-
Tag the repo with the version number. e.g.
v0.1 -
Create a new release using GitHub and upload the JAR file you created.
6.6. Managing Dependencies
A project often depends on third-party libraries. For example, card folder depends on the Jackson library for JSON parsing. Managing these dependencies can be automated using Gradle. For example, Gradle can download the dependencies automatically, which is better than these alternatives:
-
Include those libraries in the repo (this bloats the repo size)
-
Require developers to download those libraries manually (this creates extra work for developers)
Appendix A: Product Scope
Target user profile:
-
medicine students who need to rote memorisation of information
-
finds carrying physical flashcards around troublesome and prefers an application to help them store and organize their learning material
-
prefer desktop apps over other types
-
can type fast
-
prefers typing over mouse input
-
is reasonably comfortable using CLI apps
Value proposition: flashcards that are able to test the user instead of simply having them recall the answer. The user experience is more engaging and scoring is more accurate as it is based on actual performance rather than reported performance.
Appendix B: User Stories
Priorities: High (must have) - * * *, Medium (nice to have) - * *, Low (unlikely to have) - *
| Priority | As a … | I want to … | So that I can… |
|---|---|---|---|
|
student |
have flashcards with questions and answers |
have an easier time memorising content |
|
student |
create and delete my own flashcards |
|
|
student |
edit the content of my flashcards |
add on more content or correct any errors |
|
student |
have folders to store flashcards |
logically group flashcards of the same topic |
|
student |
navigate in and out of folders |
see one folder’s cards at each point of time |
|
student |
test myself on each flashcard folder |
better learn the content |
|
student |
attempt keying in answers before flashcards reveal them |
have a more engaging experience |
|
student |
view the answers of questions directly |
proceed even when I do not remember the answer |
|
student |
know how well I’ve been performing on each flashcard |
know my overall progress |
|
student |
view a progress report by folder |
know my performance for each topic |
|
student |
sort flashcards by score |
know which questions i have more trouble answering |
|
student |
import and export flashcards |
share content |
|
student |
search flash cards in a folder |
save time looking for a particular card |
|
student |
search folders |
save time looking for a particular folder |
|
student |
move flashcards from one folder to another |
better manage my flashcards |
|
student |
add hints that I can toggle on/off |
get help with more difficult cards |
|
student |
add pictures to certain flashcards |
better represent topics that heavily feature topics and diagrams |
|
student |
have a question that expects more than one answer |
test myself more complex questions |
|
student |
different template designs for my flashcards |
have a personalised experience while revising |
Appendix C: Use Cases
(For all use cases below, the System is Know-It-All and the Actor is the Student, unless specified otherwise)
UC01 Test flashcards
MSS
-
Student is inside a folder and begins a test session.
-
System presents the question on the lowest-performing flashcard first.
-
Student inputs his/her answer.
-
System indicates whether student’s answer is correct or wrong and shows the answer of the flashcard.
-
Student navigates to next flashcard.
-
Repeat steps 2-4 until all the flashcards in the folder are tested.
Use case ends
Extensions
-
3a. Student doesn’t know the answer and wants to see the answer without attempting.
-
3a1. Student uses the reveal command.
-
3a2. Answer is displayed to the student.
-
UC02 Add flashcards
MSS
-
Student navigates to a folder that he wants to add a flashcard to.
-
Student inputs question and answer to be stored as flashcard.
-
System stores the details as a flashcard under the current folder.
Use case ends
Extensions
-
2a. Student only inputs a question but no answer.
-
2a1. System displays an error message informing the user that the command format is invalid.
Use case resumes from step 2.
-
UC03 Edit flashcard question
MSS
-
Student navigates to the folder that contains the flashcard to be edited.
-
Student indicates the card to be edited, as well as the new question.
-
System stores the updated details for the edited card.
Use case ends
Extensions
-
2a. Student enters a blank as the desired question.
-
2a1. System displays an error message informing the user that the question cannot be a blank.
Use case resumes from step 2.
-
-
2b. Student enters a card index that does not exist.
-
2b1. System displays an error message prompting the user to choose a valid card index.
Use case resumes from step 2.
-
UC04 Add folder
Guarantees
-
A folder of the desired name is created.
MSS
-
Student navigates to home directory.
-
Student inputs the name of the folder he wants to create.
-
System creates a folder of the desired name and shows it on the home directory.
Use case ends
Extensions
-
2a. Student inputs a name that already exists.
-
2a1. System displays an error message prompting the user to use a folder name that is not taken.
Use case resumes from step 2.
-
UC05 Edit folder name
Guarantees
-
A particular folder as selected by the student is renamed to the desired name.
MSS
-
Student navigates to home directory.
-
Student indicates the folder he wants to rename, as well as the new name.
-
System renames the folder to the new name and shows it on the home directory.
Use case ends
Extensions
-
2a. Student inputs a name that already exists.
-
2a1. System displays an error message prompting the user to use a folder name that is not taken.
Use case resumes from step 2.
-
-
2b. Student chooses a folder that does not exist.
-
2b1. System displays an error message prompting the user to choose a valid folder.
Use case resumes from step 2.
-
-
2c. Student enters a blank as the desired new folder name.
-
2c1. System displays an error message informing that the folder name cannot be a blank.
Use case resumes from step 2.
-
UC06 Navigating into folders
MSS
-
Student indicates the folder he wants to enter.
-
System enters the folder and displays the folder content.
Use case ends
Extensions
-
1a. Student chooses a folder that does not exist.
-
1a1. System displays an error message prompting the user to choose a valid folder.
Use case resumes from step 1.
-
-
1b. Student is already inside a folder.
-
1b1. System displays an error message informing that the user can only navigate into the folder when he is at the home directory.
-
1b2. Student navigates back to home directory.
Use case resumes from step 1.
-
UC06 Display report for a folder
MSS
-
Student enters the a folder.
-
Student indicates that they want to see the report for this folder.
-
System displays a full-screen report.
Use case ends
Appendix D: Non Functional Requirements
-
Should work on any mainstream OS as long as it has Java
9or higher installed. -
Should be able to hold up to 1000 cards without a noticeable sluggishness in performance for typical usage.
-
A user with above average typing speed for regular English text (i.e. not code, not system admin commands) should be able to accomplish most of the tasks faster using commands than using the mouse.
-
The user interface should be intuitive enough even for medical students to use the app.
-
In the event where corrupted files are present, uncorrupted files should be preserved so that users do not lose their data.
-
When no data is present, sample data should be generated so users are able to use the app on launch.
-
Know-It-All works without active internet connection.
-
Know-It-All needs to be able to allow at least 50 characters for folder names and 256 characters for card information.
Appendix E: Glossary
Card Score: The number of correct answers divided by the number of attempts for a single card. When the user is tested on a card, this number is automatically calculated and recorded.
Flashcard/Card: An object containing a single question and answer, and optionally, hints. There are 2 types of cards, Single-answer and MCQ. MCQ cards feature incorrect options in addition to the card answer, while Single-answer cards do not.
Test score: The number of cards correctly answered over number of cards attempted during a test session. This number is automatically recorded after each test session.
Appendix F: Instructions for Manual Testing
Given below are instructions to test the app manually.
| These instructions only provide a starting point for testers to work on; testers are expected to do more exploratory testing. |
F.1. Launch and Shutdown
-
Initial launch
-
Download the jar file and copy into an empty folder
-
Double-click the jar file
Expected: Shows the GUI with a sample folder. The window size may not be optimal.
-
-
Saving window preferences
-
Resize the window to an optimum size. Move the window to a different location. Close the window.
-
Re-launch the app by double-clicking the jar file.
Expected: The most recent window size and location is retained.
-
F.2. Card operations
-
Adding a single-answer card
-
Prerequisites: Enter a folder using the
cdcommand. For example,cd 1will enter the first folder. The folder may or may not be empty. -
Test case:
add q/What is the largest organ of the human body? a/Skin h/Anatomy
Expected: A new card with question "What is the largest organ of the human body?", answer "Skin" and hint "Anatomy" is created. Status message confirms this and the card list panel UI on the left updates to show the new card. -
Test case:
add a/Alexander Fleming q/Who discovered Penicillin?
Expected: A new card with question "Who discovered Penicillin?" and answer "Alexander Fleming" is created. Note that this card has no hint, as none was specified. Status message confirms this and UI is updated. -
Test case:
add q/ a/Some answer
Expected: The card is not created. Error details shown in the status message. -
Other incorrect
addcommands to try for single-answer cards:
add,add some question,add q/ a/ h/,add q/Some question a/.
Expected: Similar to previous.
-
-
Adding an MCQ card
-
Prerequisites: Enter a folder using the
cdcommand. -
Test case:
add q/What does MRI stand for? a/Magnetic Resonance Imaging i/Medical Resource Image
Expected: A new card with question "What does MRI stand for?", answer "Magnetic Resonance Imaging" and incorrect option "Medical Resource Image" is created. Status message confirms this and UI is updated. -
Test case: (After executing step 1c)
add a/Alexander Fleming q/Who discovered Penicillin? i/Hippocrates
Expected: The card is not created. Error details shown in the status message. -
Other incorrect
addcommands to try for MCQ cards:
add q/ a/ i/ i/,add q/Some question a/Some answer, i/,add q/question a/answer i/answer
Expected: Similar to previous.
-
-
Editing a card
-
Prerequisites: Enter a folder using the
cdcommand. Ensure that cards already exist in the folder. For example,select 1should execute and display a card in right-side panel. -
Test case:
edit 1 a/Sigmund Freud h/Psychology
Expected: First card in the folder is edited to have answer "Sigmund Freud" and hint "Psychology". -
Test case:
edit 1 h/
Expected: First card in the folder is edited to have no hint. -
Test case:
edit 1 i/Hippocrates i/Carl Jung
Expected: First card in the folder is edited to have incorrect options "Hippocrates", "Carl Jung", and is converted to an MCQ card if it was originally a single-answer card. -
Test case:
edit 1 i/
Expected: First card in the folder is edited to have no incorrect options, and is converted back to a single-answer card. -
Test case:
edit 1 q/
Expected: The card is not edited. Error details shown in the status message. -
Other incorrect
editcommands to try:edit x,edit,edit 1 q/ a/
Expected: Similar to previous.
-
-
Deleting a card
-
Prerequisites: Enter a folder using the
cdcommand. Ensure that cards already exist in the folder. -
Test case:
delete 1
Expected: First card in the folder is deleted. -
Test case:
delete
Expected: No card is deleted. Error details shown in the status message. -
Other incorrect
deletecommands to try:delete 0,delete this
Expected: Similar to previous.
-
F.3. Starting and ending a test session
-
Start a test session while inside a folder
-
Prerequisites: Enter a folder using the
cdcommand. For example,cd 1will enter the first folder. All the cards in the folder are listed. -
Test case:
test
Expected: Enters a test session, where the display area enters a fullscreen and the lowest scoring flashcard question and hints (if any) will be displayed first.In Test Sessionis shown on the status message and status bar. -
Test case:
teston an empty folder (this folder has no cards)
Expected: The errorThis command is not valid on an empty folderis shown in the status message. Status bar remains the same (still in folder). -
Test case:
testwhen not inside a folder (prerequisite not fulfilled, like being in the home directory, already in a test session or in report display)
Expected: The errorCommand can only be executed in folderis shown in the status message. Status bar remains the same.
-
-
Ends a current test session
-
Prerequisites: Enter a test session by typing
testwhen inside a folder. Display area enters fullscreen and lowest scoring flashcard question and hints are displayed. Tester can also be in any state in the test session -
Test case:
end
Expected: Ends the current test session, where the display area exits fullscreen and be back inside the folder.End Test Sessionis shown on the status message and status bar shows that tester is back inside the folder. -
Test case:
endwhen not inside a test or report (prerequisite not fulfilled, like being in the home directory or in a folder)
Expected: The errorThis command is not valid outside a test or reportis shown in the status message. Status bar remains the same.
-
F.4. Answering a question in a test session
-
Input an answer to a question inside a test session
-
Prerequisites: Enter a test session by typing
testwhen inside a folder. Display area enters fullscreen and lowest scoring flashcard question and hints are displayed -
Test case:
ans xwhere x can be anything but empty for non-MCQ cards
Expected: If the correct answer to the flashcard question isx, a green page with correct attempt notification will be displayed. Otherwise, a red page with wrong answer notification will be displayed. For both cases, status bar remains the same to be still in test session -
Test case:
ans xwhere x can be any of the option number displayed for MCQ cards
Expected: If the option number with the correct answer to the flashcard question isx, a green page with correct attempt notification will be displayed. Otherwise, a red page with wrong answer notification will be displayed. For both cases, status bar remains the same to be still in test session -
Test case:
ans xwhere x is not an option number and not empty for MCQ cards
Expected: The errorMCQ question expects option number as answeris shown in the status message. Status bar remains the same. -
Test case:
ans
Expected: The errorInvalid command formatis shown in the status message. Status bar remains the same. -
Test case:
ans xand typeans yagain where x and y can be anything but empty for non-MCQ cards
Expected: Cannot input an attempt to an already answered question. The errorAnswer command is valid only when a question is displayedis shown in the status message. Status bar remains the same.
-
F.5. Navigating to the next question in a test session
-
Go to the next question in a test session after answering the current question
-
Prerequisites: Enter a test session by typing
testwhen inside a folder. Display area enters fullscreen and lowest scoring flashcard question and hints are displayed. Answer the current question by following Section F.4, “Answering a question in a test session” or reveal the answer so the current card has already been tested. -
Test case:
nextwhere there are still cards left untested
Expected: Next lowest scoring question and hints (if any) are displayed. Status bar remains the same to be still in test session. -
Test case:
nextwhere there are no more cards left to test
Expected: Ends the current test session, so display area exits fullscreen and status bar changes to reflect tester is back inside a folder. -
Test case:
nextwhen prerequisite is not fulfilled where the current question is not yet answered or revealed
Expected: The errorNext command is valid only when this question has been answeredis shown in the status message. Status bar remains the same.
-
F.6. Viewing a report display
-
View report display
-
Prerequisites: Enter a folder. The tester may want to ensure that they have at least two test attempts on this folder, as a line graph requires at least two points to be drawn. (If there are fewer than two attempts, it is not a bug if no line is drawn.)
-
Test case:
report
Expected: Enters report display, where the display area enters fullscreen. A graph is displayed showing maximum of last ten test scores for this folder. A list, maximum of the three lowest scoring questions, is displayed.Report displayedis shown on the status message and status bar shows that tester is in report display. -
Test case: Other invalid commands such
test,add, or a secondreportcommand.
Expected: They should not be allowed. An error message will be displayed. -
Test case:
end
Expected: Ends the current report session, where the display area exits fullscreen and be back inside the folder.End Report Sessionis shown on the status message and status bar shows that tester is back inside the folder.
-
F.7. Sorting the cards
-
Sort
-
Prerequisites: Enter a folder. The tester may want to ensure that they have at least two cards in this folder, or else there is no way to tell if the sort happened.
-
Test case:
sort
Expected: Sorts cards in non-descending percentage score. If card A is above card B, card A will not have a higher percentage score than card B.Sorted flashcards with lowest score firstis shown on the status message.
-
F.8. Folder operations
-
Adding a folder
-
Prerequisites: You must be at the home directory (status bar should read
In Home Directory) and have only one folder called "Sample Folder". To get this configuration, you can delete all data files except for the jar file and relaunch the application. -
Test case:
addfolder Folder 1
Expected: A folder by the name of "Folder 1" is added. Status message confirms that the folder added, and the new folder can be found in the list of folders. -
Test case:
addfolder Sample Folder
Expected: No folder is added. Error details shown in the status message. -
Other incorrect addfolder commands to try:
addfolder,addfolder Special/Chars,addfolder x(where x is string longer than 50 characters)
Expected: Similar to previous.
-
-
Deleting a folder
-
Prerequisites: You must be at the home directory (status bar should read
In Home Directory) and have at least one folder. -
Test case:
deletefolder 1
Expected: The folder at index 1 is deleted. Status message confirms that the folder is deleted, and the folder can no longer be found in the list of folders. -
Test case:
deletefolder 0
Expected: No folder is deleted. Error details shown in the status message. -
Other incorrect deletefolder commands to try:
deletefolder,deletefolder Sample Folder,deletefolder x(where x is larger than the list length)
Expected: Similar to previous.
-
-
Renaming a folder
-
Prerequisites: You must be at the home directory (status bar should read
In Home Directory) and have at least one folder called "Sample Folder", and no folder called "New Name". -
Test case:
editfolder x New Name(where x is the index of a folder that is not Sample Folder)
Expected: The folder at index x is renamed to "New Name". Status message confirms that renaming operation succeeded. -
Test case:
editfolder x sample folder(where x is the index of Sample Folder)
Expected: The folder at index x is renamed to its original name (with new capitalisation). Status message confirms that renaming operation succeeded. -
Test case:
editfolder x Sample Folder(where x is not the index of Sample Folder)
Expected: The folder at index x is not renamed. Error details shown in the status message. -
Other incorrect editfolder commands to try:
editfolder,editfolder New Name 1,editfolder x New Name(where x is larger than the list length)
Expected: No folder is renamed. Error details shown in the status message.
-
-
Persistence of folder operations
-
Prerequisites: You must be at the home directory (status bar should read
In Home Directory) and know where the data files are stored. By default, this will be at thedata/directory at the path of the jar file. -
Test case:
addfolder x(where x is the name not used by any existing folder)
Expected: A new json by the name ofx.jsonappears in the data directory. -
Test case:
deletefolder 1
Expected: The json with the same file name as the deleted folder is no longer present in the data directory. No other files in the directory are affected. -
Test case:
editfolder 1 x(where x is a name not used by any existing folder)
Expected: The json with the original name of the edited folder is no longer present in the data directory, replaced with a json with the new folder name. No other files in the directory are affected.
-
F.9. Navigating in and out of folders
-
Entering a folder
-
Prerequisites: You must be at the home directory (status bar should read
In Home Directory) and have at least one folder. -
Test case:
cd 1
Expected: Folder 1 is entered. Status message confirms this and UI is updated. -
Test case:
cd x(where x is larger than the list length)
Expected: No folder is entered. Error details shown in the status message. -
Other incorrect cd commands to try:
cd,cd Sample Folder,cd ..
Expected: Similar to previous.
-
-
Exiting a folder
-
Prerequisites: You must be inside a folder (status bar should read
Inside Folder: xwherexis the name of the folder you are in). -
Test case:
cd ..
Expected: The folder is exited and you return to the home directory. Status message confirms this and UI is updated. -
Test case:
cd x(where x is any combination of characters other than "..")
Expected: The folder is not exited. Error details shown in the status message. -
Other incorrect cd commands to try:
cd,cd Home
Expected: Similar to previous.
-
F.10. Saving data
-
Dealing with missing/corrupted data files
-
Prerequisites: You must know where the data files are stored. By default, this will be at the
data/directory at the path of the jar file. -
Test case: Delete the data directory and launch the app
Expected: A sample folder is present when the app launches (although it is not committed to storage until a persistent change is made). -
Test case: Insert a non-json file/corrupted json file in the data directory and launch the app
Expected: The valid json files have folders with their corresponding names present. The non-json file/corrupted json file remains unaffected.
-
-
Importing a folder
-
Prerequisites:
You must be outside a folder (status bar should readin home directory.
Ensure that you also have the file to import in the project root directory.
file has to have a .csv extension format.
The imported file has to comply with the csv file headers.
Compulsory fields, like Question and Answer should not be left blank.
folder should not already exist within the model. -
Test case:
import Blood.csv
Prerequisites: Ensure that Blood.csv exists within the project root directory.
Expected: Command box outputs a message "Successfully imported: Blood.csv" and a new folder with name Blood is added to the existing folders in the home directory, with the corresponding flashcards added to the folder -
Other incorrect commands to try:
import,import Blood.json
-
-
Exporting a folder
-
Prerequisites: You must be outside a folder (status bar should read
in home directory)
flashcard application -
Test case:
export 1
Prerequisites: You must have at least one folder existing in the application.
Expected: The command box outputs a message "Successfully exported card folders" and project root directory should contain ax.csvfile wherexis the name of the first folder in the application. -
Test case:
export 1 2 3
Prerequisites: You must have at least 3 card folders existing in the application.
Expected: The same message output in the command box as the previous test case and the corresponding filesx1.csv,x2.csvandx3.csvcreated in project root directory, wherex1,x2,x3corresponds to the name of the first, second and third folder -
Other incorrect commands to try:
export,export -1,export 12 13 14, where1213and14are non existent card folder indexes.
-